9.18.2018

10 Ways to Begin your Personal Development Journey

Becoming a better person.  That's what we all want to do with our lives, right?  We want to be the best versions of ourselves.  We're now quite far into the year and may have found that our goals haven't shaped out the way we thought they would have.  This could be good or bad...but we don't have to wait until the new year to start bettering ourselves!  In fact I think there are 3 times in the year we can start ourselves anew - January at the new year, March/April at the Aries New Moon, and September when we're used to going back to school.

this post contains affiliate links, please read my full disclosure here.

September has always had the air of a fresh new start - we've got fresh pencils, notebooks, and sneakers, the leaves are slowing turning and nature moves into a new phase.....its just a very magical time of freshness. Plus we'll have Samhain in October which is known as the Witches' New Year. So the Fall in general can be a time of change - to shed the old and prep for the new!

We don't have to upend our whole lives to work on personal development.  Nor do we have to feel pressured to change our entire beings to be these better, fantasy versions of ourselves.  Personal development is a journey where the only person you need to be better than is the person you were yesterday.  It's not a journey of comparison or defeat, its a journey of betterment.  So, here are 10 ways to begin your personal development journey:

1. Listen to Audio Books & Podcasts

Make time to listen to personal development books or podcasts.  This may take some trial and error in finding podcasts/books that inspire you but start off with a hobby or something you're interested in.  I wanted to learn to read tarot as a personal development tool so I thumbed through the tarot podcasts I found on iTunes and queued up a few to listen to.  The other part of this is prioritizing time to listen.  I used my 30 minute drive to work in the morning to squeeze in a podcast listen.  You can listen while cooking, cleaning, driving, running, etc.  Those times in between...those are good times to bust out your book or podcast.

2. Practice Mindfulness

This is another simple task that can be done in those times in between.  Mindfulness is just awareness.  Mindfulness is focusing on the moment and on the task at hand.  When making your coffee in the morning instead of going over your to do list and looking at the dishes in the sink take the 5 minutes you're prepping your coffee to just be aware: what does the world around you smell like?  What does the coffee maker sound like?  What does your mug feel like?  What does the sugar entering the mug sound like?  How do you feel in this moment?  You can incorporate even breathing, etc.  Just be aware of your surroundings.  A great place to start a mindfulness practice is in your skincare routine - you'll hopefully be alone in the bathroom for at least a minute and the act is very tactile.  So you can take a moment to just be.

Mindfulness can help fill your cup so that you can show up for yourself and for others more completely.


3. Meditation

Developing a mediation practice can be as simple as using the Breathe app on your Apple Watch (I do this so often!).  Just like mindfulness, you're taking a moment to be present.  You can have a more intentional mindfulness practice with meditation by creating a space for yourself to spend time with yourself.  This can be a room or space in your home or even one of those times in between - like waiting for a friend to meet you for coffee.  Take a moment while you're sitting in the parking lot at work to drift into a relaxed mindset.  You can use something like visualization or even an essential oil you're fond of to help get you into your meditative mindset.

4. Practice Self Reflection

Often this is outlined as journaling.  I'm not a great journaler - I'll blog somethings and maybe include short self reflective tidbits in my memory planner, but all in all I'm not a good journal keeper.  I think it is more important to be self reflective and to examine myself, my life, and my actions often to see where I'm at.  Creative ways to do this aren't limited to journaling but to creating and keeping vision boards so that you can see how far you've come, keeping planner & expressing your creativity, or even blogging!  Self reflection ensures that you're actually growing and developing.  Sometimes those little time hop things on Facebook are very helpful for seeing where we've been compared to where we are now.  And, if you're unhappy with where you are....then you are able to set an intention to change that!

5. Set Small Goals

Speaking of setting intentions to change, try setting small goals.  I used to set 4 simple goals a month because I realized I just wasn't really working towards anything.  I was kinda coasting through life just hanging out and I really wanted to be doing something (anything!).  Setting smaller goals - go to bed earlier, wake up earlier, clean the living room each week, put the dishes away, make sure you moisturize - can help you develop and over all bigger routine.  This routine can enhance your daily life be reducing the emotional burden you have by needing to make decisions that could be left to routine.  Achieving small goals can also build up your confidence & momentum when it comes to accomplishing bigger goals.

6. Try Something New

Break out of your comfort zone.  Trying something new means you're not keeping yourself in a box.  This box could feel restrictive or destructively habitual.  It is best to do something new as soon as you feel the urge.  I signed up for a watercolor class at my local Micheal's as soon as I found out it was happening because I new if I thought about it I'd chicken out!  If you get the urge, and it's feasible, try something new!


7. Invest in Yourself

Much like the one above, if you've been wanting to try something new make that a priority.  The more you invest in your desires the more you'll find personal success.  Want to start a new hobby? Prioritize that in your life.  Want to go back to school?  Prioritize that in your life.  Need a new set of interview clothes? Invest in that!  You are worthy of your desires and you should invest your time & available resources into the things that will create a better you and better your life.

8. Discover your Personal Mantra

Working daily with affirmations can help shift your mindset.  You may find yourself drawn to certain types of quotes, words, or mantras that help you feel inspired.  Take time to develop a personal mantra to live by and make sure it aligns fully with who you are as a person.  Create a Pinterest board or even a wall of sticky notes with words that speak to you.  Recite them daily until you feel their truth!  I highly suggest you reading my post on self-deprecating here

9. Make Small Changes

Small changes in your lifestyle allow you to live more authentically.  For me, I've been attempting to reduce my dependence on single use/disposable items.  Prioritizing using microfiber towels over paper towels, refusing plastic straws, and prioritizing reusable storage over plastic baggies have been small changes that have led to a bigger awareness in my life.  Take the time to make small changes that align with your personal mantra & you will begin to live more authentically.

10. Practice Gratitude

Being thankful for what we have can shift our mindset.  Not only should we be thankful in times of happiness but we should practice gratitude in our down times as well.  If you're frustrated with a situation finding gratitude around the problem can help shift your mindset into a solution.   Take a moment during each day - when you wake up, before bed, at your lunch break, on your drive home - and list three things you're grateful for.  Even the simplest things you can express gratitude for because it allows you to be mindful of what you really have in your life!

Lunar Newsletter

Get on the List!

* indicates required


Personal development also isn't extremely linear.  We can have up days and down days, we can have setbacks and comebacks...but overall we just want to be better than the people we were yesterday!  Be sure to sign up for the newsletter above to get creative inspiration for being your best self straight to you inbox.  You'll receive blog updates, essential oil information, creative freebies, and general chit chat.

If you're interested in working towards your personal development goals with a group of creative individuals like yourself, check out the Live & Create group on FacebookThis group focuses on mindfulness & intentional living through productivity, creative planning, & personal growth.  Request to join here!  You can also join the Printable of the Month club over on Patreon for an exclusive planner printable every month.

What small goals do you set for yourself daily?

xoxo, Moe

9.11.2018

How to Create a Personal Altar in Shared Spaces

Sometimes our spiritual practices might weird people out.  Why do you have all those rocks? people ask.  What's all this stuff on this table? they'll say.  Often as their picking items up and turning them over in their hands.  Keeping a discreet altar - whether in your home, office, or dorm room - can have an array of benefits with out having to explain things to curious folks.  Though, I am always down for it personally...it can be kind of distracting.
this post contains affiliate links, please read my fulls disclosure here.

Creating an altar in your personal space is important.  Whether it is for ritualistic practices or a place for peace and meditation, we often don't want to have our personal spaces invaded or feel odd for having them in the first place.  Keeping a discreet altar space can be perfect for those still in the broom closet or those who share a common space - like a shared apartment or dorm room, or for a more intimate office setting.  Personally, I have a big ol altar at home in my spare room that I don't care if anyone sees but when it comes to keeping somethings on my office desk - for personal power, calming vibes, and just all around comfort - I choose to do something discreetly that doesn't even seem like an altar at all!

Items to Include on your Altar

While everyone has different things on their altars here are a few key pieces to keep in mind:

The Elements 

You can represent the elements - fire, air, earth, water - in various ways.  Add plants for earth, an essential oil diffuser for air & water, etc.  You can also charge these things with your intentions as you set up your work space.  The great thing about a diffuser is that you can choose certain oils with certain correspondences but you can also charge the water with your intentions as you fill your diffuser for the day.

Deity Correspondences 

Different knick knacks on your desk can have different associations to certain deities if that is a part of your practice.  You don't need to have an all out dedicated statue that may seem out of place (we're attempting to be discreet here) but just a little tchotchke with your personal deities will add just a touch of reverence to your space.

Current/Relevant Spellwork

This may be something that might only apply if you're currently doing any spellwork around your place of business - maybe keeping a money spell present, etc.  Not something totally necessary but you may find a place for it.

Personal Power Objects

While a little woo woo for my office, I used to keep the current crystals I was working with on my desk.  These were visual reminders for me throughout the day for certain energies and emotions I was attempting to usher into my life.  Same with the essential oils I'd use.  You can also choose other tchotchke like items that have a certain personal power significance to you but that aren't necessarily woo woo.

Creating Your Altar, Discreetly

Like I mentioned, at home I go all out with what I've got on my altar - crystals, boxes, oils, incense, animal totems, sabbat decorations, I mean it's endless (and often a mess!).  But in smaller or more public spaces, we can be more choosy or specific.

 Work Space Altar

Shop this Look

Depending on where you work, your personal space may have very different types of decor.  The example above has a sleek look and features a lot of light.  This is a great little space to feel inspired!  I imagine the person in this office getting so much stuff done!

My personal desk space at work isn't as elegant as this so I choose to express my quirky fun side with some plant Shopkins (yes, I'm a 30 year old woman who thinks shopkins are the cutest), my diffuser, and other objects that remind me to lighten up.  My job can be kind of intense with a lot of frantic energy so fun little objects that lighten the mood and cheerful essential oils keep me in the good vibes category!

Dorm Room Altar

Shop this Look

I think most of the time in a dorm room or shared apartment we're among like minded people so it might not be too weird to have some of these things around your space. But we still might not be ready for a ton of questions.  Creating a small altar space on your desk, night stand, or little shelf in your room can make our shared spaces seem a little more sacred.

When I was in college I loved to have small collections of inspiring nick knacks.  These little collections of things really made me fill at home and gave me a space to feel inspired.

Creating these personal altars bring a feeling of safety to our spaces.  We feel at home and we feel like we can still work on our personal goals.  Sometimes we are asked to be different people in different spaces - at work I'm not going to blabber on about chakras (unless someone asks) - so bringing elements of ourselves into these spaces can give us a sense of purpose.

If you'd like to learn more about crystals, essential oils, chakras, etc head on over to join the Live & Create Facebook group where we talk about mindful & creative living through productivity, planning, and personal growth!

Do you personalize your spaces?  Do you have a personal altar at work?

xoxo, Moe

9.06.2018

How to Write Actionable To Do Lists (and Why You Should)

To do lists are a big part of my planning routine.  They don't usually reside on my weekly pages (though there are exceptions to the rule!) because I like to write specific and actionable lists - so I break things down.  This requires extra space in my planner - either graph filler paper, extra inserts, or sticky notes.
this post contains affiliate links, please read my full disclosure here.

If you've ever looked at your planner and felt complete overwhelm, then an actionable to do list might be something you should focus on.

How to Write Actionable To-Do Lists

Brain Dump

First, you may find there's too much in your head to keep anything straight.  Make it a habit to brain dump all your thoughts & to do's into one master list somewhere in your planner.  This is going to be the place you turn to when you need to get it all out...it will be your master list (and it will be messy!).  Give yourself permission to get messy, scribble, and get it all out.  From here you can prioritize and even eliminate.  Refer to this list often - you will add to it and you will subtract from it, but you may also find you will eliminate the things that are either no longer important, not worth your time, or are unnecessary.

Get Specific

From your brain dump it is time to get specific.  Which projects are you working on?  Which big tasks can you see?  This is especially helpful if you're running something like a blog - instead of marking down write posts, get specific and write down exactly which posts need to be written.  Then you can, again, prioritize from there.  It may help to have a few different sections in your brain dump area - one master list, then other lists around certain areas of your life.  But don't make this too complicated.  Come up with a method that works that you can quickly refer to and fill in as time goes by.  Make it something you'll actually use.

3 Action Steps

Once you've prioritized your list - like outlined the specific posts you'd like to write on your blog - then you can get to the action steps.  I am a big fan of 3 action steps under each to-do.  This helps you realize exactly what needs to be done & shows you your progress as you move through the steps.  It also makes completing the whole task easier because you're seeing the bigger picture.  Once you get into this routine you can also start to see how certain actions over lap to other tasks and you're more likely to complete them out of habit!  It can be as simple as outlining laundry in your planner - wash, fold, put away.  For me seeing the steps means even if I haven't completed everything I can check my progress and feel more productive.

If your to-do is a bigger project you can make a project planning page in your planner to house everything that needs to be done.  For inspiration, check out my wedding planning video where I use the project planning pages to outline this big project!  I also use the project stickers from the Student Sticker Books when I need to plan out projects.  

Why You Should Write Actionable To-Do Lists

Short answer: because you get more done!

Actionable to do lists help us plan better.  They help us allot time in a more efficient way, help us prioritize tasks, and help us say no to things that won't or don't serve us.  Through actionable to-do lists we can meet ourselves where we are and eliminate overwhelm.  We can understand how long it takes us to complete tasks & that can help us estimate our abilities in the future.

When we're breaking up tasks into their moving parts we're seeing the bigger picture and are able to understand a timeline better...even if it's just a Sunday afternoon and we need to get laundry done for the week!

Ever since I started creating a plan of action rather than a running to do list, I've been able to get projects done on a better time line!  No parts are missed, nothing is left to the last minute, and there's nothing unexpected.  One of the best parts is being able to translate what I've learned from one project or task into another, similar task or project.  I've also sort of been able to create 'templates' of reoccurring tasks to help me in the future.

Want to find some printable planner inserts that can help organize your life?  Check out the Etsy shop here for A5 & Personal Size inserts. Or join the Printable of the Month Club over on Patreon for an exclusive printable each month!

How do you write to do lists?  What helps you get the most done?

xoxo, Moe

9.04.2018

Beginners Guide to Blending Essential Oils

Creating your own essential oil blends can be a great way to develop your intuition and improve your emotional (and physical) wellness.  Blending essential oils can seem to be an intimidating task!  Perhaps you've gotten yourself a starter kit or you've collected essential oils that you feel drawn too, but you're not sure how to blend them to get the best emotional and/or physical benefits.  Well....let's get you on your blending way.
this post contains affiliate links, please read my full disclosure here.

I've share quite a few seasonally specific blending guides as well as an in depth look at traveling with essential oils but this post is all about helping you create your own blends for your own needs.  Below is the exact way I started to learn about blending essential oils and I can't wait to share it with you.  You can also find some information on using essential oils topically here.  Check out all the essential oils posts on the blog here.  Let's get started.

Essential Oil Categories

Citrus

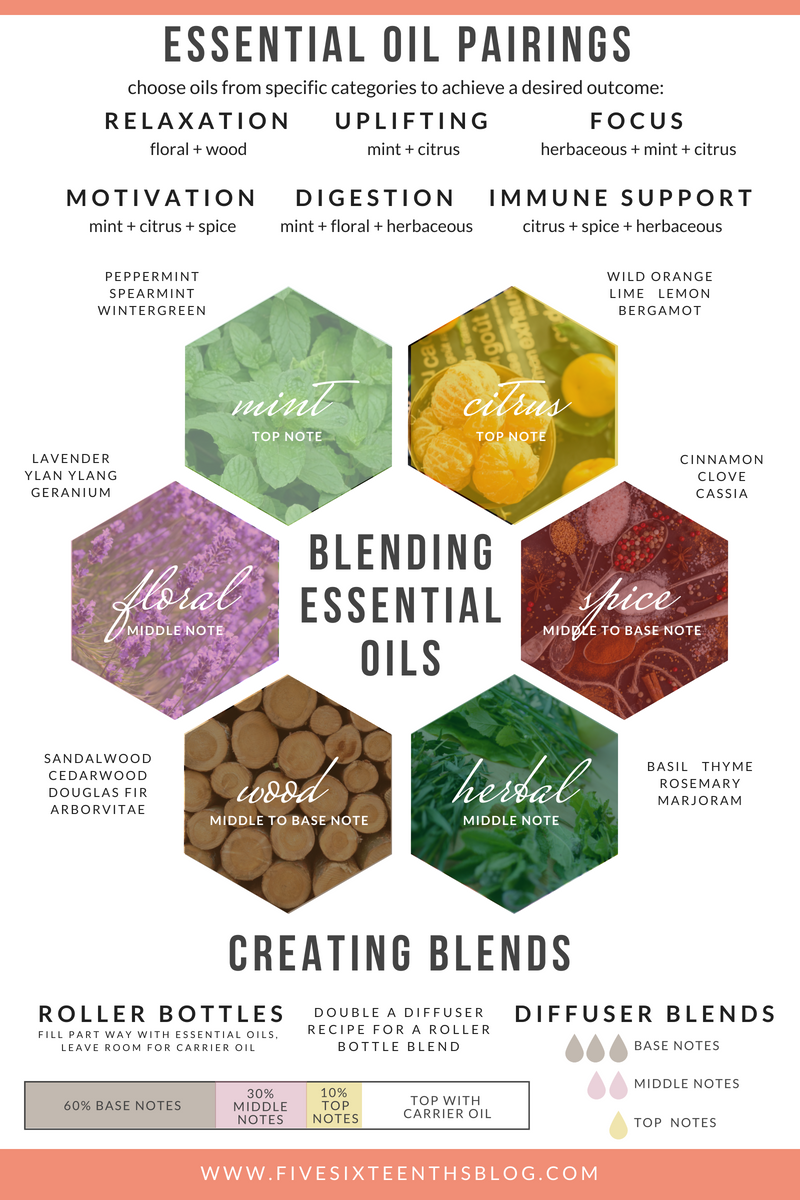
Wild Orange, Lemon, Bergamot, Lime - these oils are fruity, fresh, & clean.  Most often citrus oils are top notes.  Citrus oils are great for adding a fresh kick to your blend and can help to remove odors & purify the air.

Spice

Cinnamon Bark, Cardamom, Black Pepper, Cassia - these oils are warm & deep.  Some oils in this category can often have a resinous scent - slightly sweet or with a vanilla like tone - to them.  This attribute is called 'balsamic'.  Oils in the category are often middle to base notes that add an interesting layer to a blend.

Herbal

Thyme, Basil, Rosemary, Marjoram - these oils are herbaceous.  They smell green, herby, and grassy.  Oils in this category are fresh & sharp and often are middle notes.  They can add a spring time vibe to your blends.

Mint

Spearmint, Wintergreen, Peppermint - these oils have a minty fresh kick.  Sometimes falling in the herbaceous category (Rosemary & Peppermint are related to each other!) but they have a distinct pep when added to your blends.  Most often these are top notes.

Wood

Arborvitae, Cedarwood, Sandalwood - these are all wood oils with a grounding scent.  These oils evoke a sense of stability.  The scent is rich & woody.  These fragrances are middle to base notes and can round off a relaxing blend.

Floral

Lavender, Geranium, Ylang Ylang - these floral oils smell soft, feminine, and powdery.  Floral oils are mostly middle notes.  These scents can be relaxing & supportive.


Getting Started

First off, determine the goal of the blend.  Are you looking for immune support?  Are you feeling nauseous?  Are you looking to relax?  Are you looking to focus?  Determine what the purpose or end goal of the diffuser blend is.  This will help you decide which oils to use.

Then, begin to gather a group of oils that fit the purpose or goal your going for.  If you'd like focus choose oils from the herbaceous, citrus, and mint categories.  If you'd like to feel relaxed choose wood & floral oils.  If you'd like to feel motivated choose citrus, minty, & spicy oils.  If you're looking for an immune supporting blend choose citrus, spice, and herbaceous.  Need digestive relief? Choose a mint, floral, and herbaceous oil.

Once you've chosen a few oils from each category designed to target your end goal, you can begin to pair them together.  There's no rule saying you can't have two of the same category oil in your blend so you can start by pairing together two citrus oils, two herbaceous oils, and so on.  Once  you get a little bit brave you can start to bring in other oils in the categories you've chosen to create blends you love.

More Blending Tips

Keep a Journal

Writing down your blends - including how many drops you used - will help you decide what you personally like & what you personally find effective.  For me I know that adding in too much Peppermint to any blend will be too overpowering for me. I've translated this into how I approach other minty oils like Spearmint, Wintergreen, and the Breathe blend.  Your journal doesn't have to be super fancy, you can even just make notes in your phone!

Get Creative

When you get brave enough just grab a base note, middle note, & top note OR an oil from a few of the categories above and just see what happens!  You may find an interesting combo you never would have tried before!  You can pick a few oil bottles, uncap them, and then hold the group of caps under your nose to see if their scents work nicely together.  Sub out different oils until you find a blend you like.  This is where cap labels can come in handy!  You don't want to mix up your tops or you'll have a hard time doing this creative experiment again.


Store your Blends

Before you make a giant 5ml bottle of a blend you think you'll use all the time make a smaller batch in a 5/8 dram bottleI phase through blends I make very quickly especially when I'm inspired.  When I first started making blends I'd want to make a bottle to keep and use later....but then I'd get bored!  So these smaller bottles are prefect to create a smaller blended batch & not waste the essential oils.  And you can travel with these better too!  You can also get smaller roller bottles in order to test out any topical blends.

Choose High Quality Oils

Essential oils are a popular thing right now leading a ton of companies to want to get in on the boom.  This creates a situation where in order for companies to make the most buck, they cut corners.  As there is little regulation on what can be labeled a 100% pure essential oil, bottles found in the grocery store, home good stores, and even health food stores may not be the best quality.  They may be cut with synthetic fragrance oils or other carrier oils that dilute the purity & efficacy of the oil itself.  I choose to use doTERRA Certified Pure Therapeutic Grade Oils for a myriad of reasons - one of the most important being quality.  DoTERRA tests each & every batch of oils prior to bottling to ensure quality, purity, & efficacy.  They also source high quality plant matter and process the raw materials near where they are grown.

Using high quality oils not only ensures that nothing unnecessary will enter your body if you're using these blends topically but it also ensure the fragrant profile of the essential oil is preserved.  Working with a low quality lavender oil may not yield the same effects as working with a higher quality oil.  Any synthetic fragrances may cause headaches or other adverse health effects....when the whole point is to help yourself out!


Grab the Free Ebook!

* indicates required


Creating your own essential oil blends is a great way to connect to your oils and get used to their physical & emotional applicationsDoTERRA offers a chemistry handbook with more information on the chemical make up of oils and which oils blend together well based on their chemistry.  This can add another level to your blending and works great to create things like cleaning solutions & skin care serums.  

The proprietary blends offered by doTERRA can add another layer to your blending creativity as well. One of my favorite books regarding the emotional associations for essential oils is Emotions & Essential Oils.  This book elaborates on the emotional balancing properties of both the single oils & proprietary blends.  You can cross reference an emotion your feeling or an emotion you'd like to feel with oils that can help with that situation.  The book also offers an emotional wheel that outlines which oils are great for different emotions.

I hope you found this post helpful and feel inspired to get started creating your own personal diffuser & roller bottle blends.  It is a great exercise in both creativity & intuition! If you'd like to learn more about working with essential oils everyday join the Live & Create Facebook group!

Do you create your own blends? What is your favorite essential oil blend?

xoxo, Moe

Disclaimer :: These statements have not been evaluated by the Food and Drug Administration.  This article is not intended to diagnose, treat, cure, or prevent any disease.