When I first purchased my Cricut Explore it came with a few projects to complete. I immediately tossed those aside and worked on figuring out Print then Cut. Since then, I've been super satisfied with this machine! I figured it was high time to work with vinyl - one of the big reasons to pick up a Cricut Explore! Have you seen all the amazing things people create with vinyl???
(this post contains affiliate links, please read my full disclosure here.)
Last week I showed you how to digitize your handwriting for use as an overlay over your photos. Handwriting and hand lettering is all the rage now. What if I told you that you can digitize your handwriting and use it as a cut file with your Cricut Explore? What if I told you that you didn't need crazy software - just your phone? Here's how to do it :
supplies // iron on vinyl, Cricut Explore die cutting machine & mat, digital image of your handwriting (follow this tutorial), small pouch (similar here), iron, weeding tool (optional, you can use something like a tooth pick instead)
Start off by following this tutorial to create a digital image of your handwriting. Stop once you have an image where the text is black and the background is white. Once you have the black and white image saved, email it to yourself - or use an app/service like DropBox or Google Drive - and then save it to your computer. Then move on to the steps below.

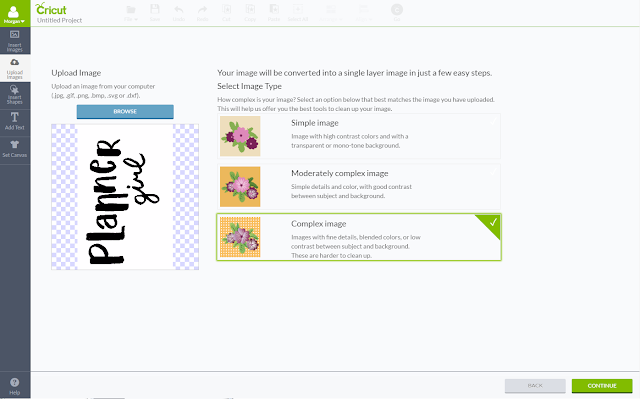
From a computer, navigate to Cricut Design Space and open a new canvas. From the left hand menu choose Upload Image, click on Browse and locate where you've saved the black and white image, and select open. Choose Complex Image, then click Continue.
From the clean up screen, use the magic eraser tool to clean up all white areas. Zoom in if needed to clean up all white in between letters. Use the Preview button at the bottom if needed. Once the image is cleaned up, click continue.
On this final screen, choose Save as Cut Image. It may take a moment for this all to load, so be patient! This will turn the image into a cut file allowing you to cut the words from a material like vinyl. Save the file & add the saved file to the new canvas.
Size the image on the canvas properly, then select Go. Prepare the vinyl and the mat. From the Go screen select Mirror for Iron on. On the Cricut Explore machine set the dial to iron on. Load the mat & cut the phrase.
The Cricut Explore is such a versatile machine. I love that I don't have to do any guesswork when it comes to what depth to set the blade, etc. The Smart Touch Dial is super easy to read and super easy to use. At first I thought the blade didn't cut through at all....but I was so happy to know it did!
Once the phrase is cut, remove the negative image of the phrase and then weed out any vinyl between the letters. Next, iron on the vinyl according to the directions - I used the Cricut vinyl and the instructions were super easy to follow! I was so impressed that I was able to do this!
The best part about this little pouch is that it will fit smaller planners. It fit my personal size Filofax Originals, a small fauxdori, and my Medium Lilac Kikki. But you can totally use this to tote around supplies (or even make one as a gift perfect for a make up bag!)
Find more Cricut Explore posts & projects here.
What would you make with vinyl? What have you made with vinyl?
xoxo, Moe


No comments:
Post a Comment
Hi there, thanks so much for taking the time to comment. I love &value each & every one! If you have a question, I will respond as soon as I can. Don't be afraid to shoot me an email! If you have a blog, I will pop on by :)