8.31.2016

Fall Planner Line Up // Free Fall Countdown Stickers

The best thing about fall is how cozy everything gets.  All the warm colors, the flavored coffee, the cozy candles.....Fall is the start of the best time of the year.  The next four months are awesome: first we start with the cozy month winding down from Summer, then there is Halloween, then Thanksgiving, and then Christmas!  
this post contains affiliate links, please read my full disclosure here.

I've adjusted my planner line up for the fall too - I've moved into a personal size Webster's Pages Color Crush planner in Walnut, a new Simple Stories A5 Carpe Diem in Marigold, and a Studio Calico Hello Forever Planner in Melon.  Each of these I've decked out for fall and I wanted to share with you not only the decor they have but the plan I have for them:

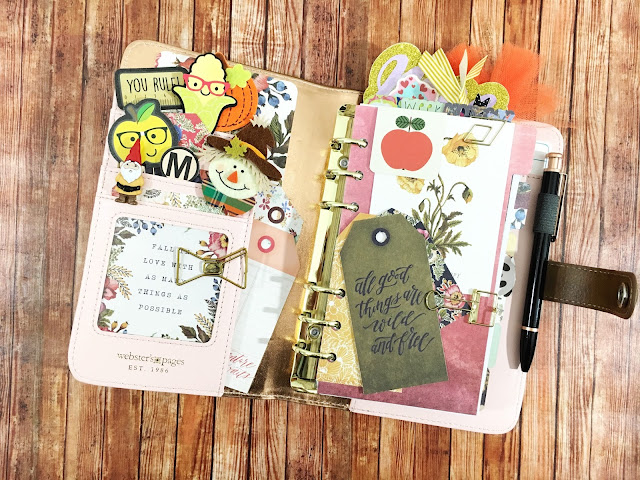
Personal Size Webster"s Pages Color Crush Planner in Walnut
The Webster's Pages Color Crush planners have quickly become my favorite, affordable personal size planner brand.  If you've seen any of my reviews - here, here, & here - you'll know that the Color Crush has grown on me.  From the first one I got that I wasn't so pleased with to the current Spring/Summer 2016 release that I was thrilled with, I've purchased quite a few of these bad boys.  I don't currently use the inserts that Webster's Pages makes, I use a combination of the inserts from my shop.
This planner is my go with me everywhere daily focus planner.  I am hoping to get back into a daily focused routine with this guy.  I will have monthly, weekly, & daily pages in my calendar section.  Not only will this help with daily tasks but will also help me notate things on the go.  I was thinking of making this solely a work planner (for my blog, etsy, and YouTube) but I also like to have a mini set of everything on the go.  So I'm keeping my original 6 tabs - including a work tab with my blog, etsy, and YouTube ideas and schedules, as well as the routines, mail, notes, and miscellaneous.  You can see previous set ups here & here, honestly it hasn't changed much.  My main goal for this planner is to just get back on my daily routines - scheduling time, making lists, and getting things done.
One of my favorite things about the new Webster's Pages planners is that little clear photo pocket in the front.  I use it for a journaling card with an inspiring quote, and as soon I as I saw this quote in the We R Memory Keepers Wildflower paper pad I got at Tuesday Morning, I knew this was the paper pack for fall.  I used a lot of the cut-a-part elements as decor and made planner clips using the following tutorials - the apple with glasses and the You Rule clips are made with stickers like in this DIY and the Scarecrow and Pumpkin are made using this DIY.  The corn clip was made using my Cricut Explore and some of the images as part of the Cricut Access Subscription.  The planner gnome is made using a button from the sewing department!

You can find this planner here on Amazon or here on Blitsy.  Don't forget to sign up for Blitsy - a super cool discount craft site - here.

Simple Stories A5 Carpe Diem in Marigold
The Carpe Diem planners have quickly become my favorite A5 size planner (over the Webster's Pages and even the Filofax Original I have) because of how well they fit the Erin Condren Life Planner.  I uncoiled and punched my ECLP into a OG Carpe Diem - with the fabric interior and the polka dots - and fell in love.  These planners are wide enough not to smush the tabs with both a pen in the pen loop and the button tab closed.  The new planners are a bit thicker, however, due to the fact that they are now made entirely of the faux-leather outer covering.  Additionally, the new planners come with out inserts, apparently they are sold separately this year.  Keep a look out for a comparison video to go up on the YouTube channel! 
This planner is my main or my big planner.  It houses the main schedule and the main monthly calendar.  I love the layout of the Erin Condren Planner and how the vertical style works for me.  I break my day down into To Do, Today, and Little Things - much like the rest of the planning world - and use location & symbols to code rather than color.  You can read more about the anatomy of a no white space spread here.  I plan on continuing to use this planner as the main over view planner & to play with sticker kits...just because I like stickers!
To decorate the main pocket in the front of this planner, I used some stickers (coffee cups here and the Fall Countdown is available at the end of this post!).  In each smaller pocket are some other fun elements - page flags, washi cards made with this tutorial, ribbon paper clips, bow & ampersand paperclips from 5Below and Hobby Lobby, & the apples with glasses were made using this tutorial.  The pom pom was from a lovely planner friend at a meet up in August.  To make the dashboard I used the Rhonna Deisgns app, the tutorial is here.  The typewriter bookmark file will be available soon but until then you can make your own sushi magnetic bookmarks with this tutorial.

Find this planner here on Scrapbook.com, or here on Blitsy.  If you use this link and create a new Erin Condren account, you'll get a discount on your first purchase!

Studio Calico Hello Forever Planner
I originally purchased this planner in Graystone one time when Studio Calico was having a 20% off sale (watch my first impression video here).  Since then, I've purchased the other two colors - Melon and Clear Sky - from another sale on the website.  I love these planners because they are the best size to fit an Erin Condren or Happy Planner uncoiled, untrimmed, and punched.  (Watch a comparison video on the best A5 planners for ECLP or Happy Planner here.)  I dislike these planners because the quality reminds me of an old photo album.  Honestly the quality seems to differ between all three colors - the Graystone color has a flimsy feeling elastic yet the Melon color has an elastic that feels very thick.  I also now have 3 sets of inserts I'm 100% not going to use!  They are pretty hokey looking and I think and 8th grader in a graphics class could design them - they aren't clean enough to be sleek and modern & they aren't curated enough to be inspiring.
When I first got the Graystone color, I figured 'since I had it. I might as well use it' and turned it into my memory planner.  Turns out I love these planners for that purpose and have just switched over to another color.  For this planner the only goal is to have fun.  I plan to document my weeks with a theme, pictures, and more decorative stickers.  This planner is purely fun for me, it doesn't have to be functional.  I love this because I can be creative - I can mix patterns, I can pull different designs, I can just play with out the fear of not checking anything off!  This is more of a what happened this week type of thing than a what will happen in the future thing.
To decorate this planner for fall, I filled the main secretarial pocket with stickers I would use in the planner so that they are handy.  The smaller pockets are rather odd sizes so I put some colorful page flags in the smaller pocket along with a bow clip from 5Below and a glitter die cut leaf.  I used a DIY shaped paperclip to hold some fall inspired journal cards together and used two yellow ribbon clips to add some fun.  There are a few To Do list sheets from a Target notepad held together with a typewriter magnetic paperclip as well as an exclamation point clip.  I also use pocket pages in this planner - the 6x8 size fits perfectly and you only need to punch 4 more holes as the two existing holes line up with the middle ring of each set of 3 rings.  I also put washi tape over the disc punches of this Happy Planner sticky not insert to create a dashboard for my planner.

Find this planner here on the Studio Calico website.

Now that I've shared with you my Fall planner line up, I wanted to sneak in a free sticker printable for fall - the Fall Countdown Stickers as seen in the pocket of the A5 Carpe Diem!  There are multiple file types included for you - a PDF for you to trim by hand, a Silhouette file if you've got a Silhouette die cutting machine, and a PNG file if you've got a Cricut Explore cutting machine.  I do hope to start adding all three of these files into the blog (and into the Free Sticker Friday posts) but I need to work through some of my stash of designs before making more

DOWNLOAD THE FALL COUNTDOWN HERE


Remember, as with all printables on my blog these files are for personal use only.  Do not sell this file or claim it as your own.  Do not sell anything created from this file. Do not disseminate this file or end product in mass.  If you would like to share these stickers online please link or Pin to this blog post and not the files themselves.  As always, thank you for playing nice!

If you'd like some more planner printables, please click here.  Looking for more planner posts, click here.  Want to know more about the Silhouette vs the Cricut?  Watch my vlog here.

8.29.2016

Make it Monday // DIY Mini Journal using the Cinch

Guys - I'm participating in 30 Lists.  You may remember that I've tried this like two times in the past and failed horribly at it.  I've been working on my own listing journal and that has taught me a lot about this process - intention and priority are two of the words that journal has taught me - and I plan on finishing my 516 listing journal this coming weekend since it will be a 3 day weekend!
Mini Journal DIY with the Cinch
this post contains affiliate links, please read my full disclosure here.

But today's DIY is about creating a small journal using the Cinch tool.  This tool is one of my favorite high end craft tools and it gets very little use in all honestly.  So I thought I'd break it out for this little listing journal since I needed to whip one up in a hurry.  Let's get into it.

supplies :: Cinch tool, pliers, cinch 1" binding, at least 30 4x6 grid journal cards, 2 4x6 journal cards for cover, laminating sheets, laminator, scissors, assorted 3x4 decorative journal cards, assorted 6x6 paper pads, corner rounder, assorted washi tape, paper trimmer, library pockets (optional)
First, choose the 6x6 papers to use for this project.  I chose about 20 patterns to use from quite a few paper packs.  My inspiration for this journal came from two bright neon library pocket envelopes I had in my stash.  I'm pretty sure they came from the Dollar Tree in the teacher section at one time, but I'm not 100% sure.  The bright neon pink and electric green inspired the colors I chose from various paper packs.  The paper packs I used for this project are Amy Tangerine Sketchbook, Heidi Swapp Favorite Things, an American Crafts paper pad, and Pink Paislee Citrus Bliss.  Next, choose the coordinating 3x4 cards you'd like to use - the kits I used that went well with my color scheme were the Heidi Swapp Favorite Things and the Project Life Sunshine Edition packs.  
DIY Journal
Using the paper timmer, trim the 6x6 papers down to 4x6 size. Round the corners with the corner rounder.  This is one of my favorite punches because it has multiple options depending on the corner radius you need for a project.  The sharpest radius is the one that matches the Project Life radius the closest.
Project Life DIY
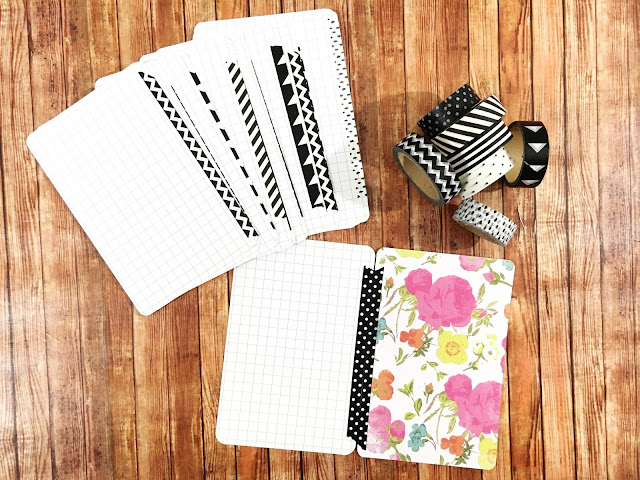
Because these paper pads aren't double sided, the washi tape will create a 'double sided' look to the journal pages.  Place the tape along the side of the 4x6 grid card (it is easier to make a straight line this way), align the two journal cards wrong sides together, fold the washi tape over on to the patterned paper.  Repeat for as many 4x6 patterned papers you have.  You don't have to have 30 of them, it is better if you have just slightly fewer.  20 - 25 patterned papers should be good.
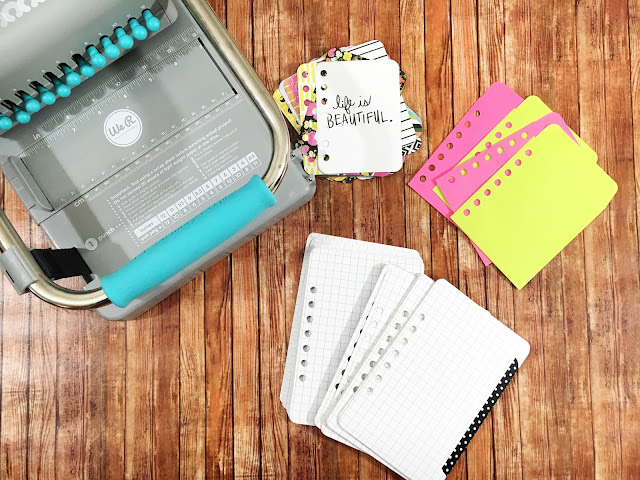
Using your Cinch tool punch the pages in the alignment you'd like.  I use the info printed on the Cinch as guidelines (kinda like how pirates use rules....just as guidelines) for punching holes.  But I also just make it up as I go.  To repeat the spacing I did - pull out the first two knobs as well as 10 - 12.  Leave the guide pushed all the way in & punch all the 4x6 cards excluding the front covers.  Once the front covers are laminated, pull out the guide just a tad (one click) and punch the two covers.  To punch the 3x4 cards push in all knobs 1 - 7, and pull out all knobs 8-12.  Bring the guide back to its original position and punch all 3x4 cards.
Assemble the cards on the coil, back and front covers right sides together (back cover on the coil first) then add your inserts the way you'd like.  Use the back end of the Cinch to close the coil.  You can see detailed instructions in this post.
And now you're done!  I love this little guy - a great way to use up scraps and create a cohesive look.  I've found the way to create something I really like is to form it around an inspiration piece and come at the project with intention.  Some projects can be created all willy nilly but some projects need to be planned.  I really wanted this project to be super simple so the only other elements I'll add into this listing book are the scraps from this project, a black pen, and highlighters.  I do plan on stamping the list numbers - I'm not going by date because I know I won't finish it like that! - using some ink and stamps I have already.  If all the work is done, all I have to do is write.  And I wanted all elements to fit in a small pencil bag!

Do you do any journaling?  Have you tried any list challenges?

xoxo, Moe

8.26.2016

Free Sticker Friday // Cricut Ready Happy Mail Stickers

Time for another edition of Free Sticker Friday - this time I've got some Cricut Ready stickers for you!  I've been loving making these stickers for you all each week. I have especially been having fun making them for the Cricut Explore!  The Cricut Explore isn't the most popular machine for cutting stickers in the planner community but it is definitely possible.
this post contains affiliate links, please read my full disclosure here.

These little neon envelopes are great to mark happy mail days, snail mail going out, or even (the dreaded) bills.  To use these simply save the PNG file, upload to Cricut Design Space, add to your canvas, and size the width to 5.5 inches.  (Keep the proportions locked so that the height automatically resizes.)  Then click on go!  I use the vinyl setting on my Cricut Explore to kiss cut these, but you may also try using the Washi Tape setting.
If you'd like to find some more Cricut Ready stickers, click here.  You can also find some Cricut Explore tutorials on my YouTube channel, here.  One more link - find Cricut Explore DIY's on the blog here!


As with all printables on my blog, this is for personal use only.  Please do not sell the design as is or use the design to make anything to sell. Do not sell the printed stickers made with this design.  Do not disseminate these in mass quantities or share this file.  If you would like to share this link with friends, please link or Pin this blog post and not the file.  Thank you for playing nice!

**Updated with a PDF file included in the download!**

Enjoy!

xoxo, Moe 

8.23.2016

Currently Watching // Netflix & More

I have been a streaming video only person for about 5 years now.  That means I've not had cable, only Netflix, Hulu, Amazon Instant Video and the like for the last 5 years.  We do actually have a cable subscription since the package we got made for faster internet...but the cable box is currently in the closet of the spare room.  So all I watch - besides YouTube - are streaming services, etc.  So this is what I'm currently watching.
So this has been talked about for a long time now.  We finished this show about a week or so ago...maybe a little longer.  I do have to say this is an amazing show.  It is super creepy, much more creepy than I thought it would be.  You may be expecting a big long conspiracy thing for this one....but I don't have it!  While I really, really enjoyed the show and think it totally has the creep factor and the WTF factor going on...I am fully satisfied with the cliff hanger ending.  I guess I didn't go as deep as I could have while watching this because I don't have the same questions that everyone else has.  I guess I took it for a complete story with intended unexplained things and I am satisfied with that.  I have been watching a lot of crazy stuff on YouTube with alternate theories, etc.  But I just thought it was a good story....and would have probably made a really awesome book.  I think if it was a book, I would have gone deeper.
Netflix only has a GA collection and that just doesn't do it for me so I've been streaming the episodes I can from the Travel Channel website.  I just like ghosty things, guys.  Give me any ghosty show and I'll watch it!  This one is sort of more freaky because the narration by the main guy Zak is half way scary with creepy reenactments and half way hilarious with all the rhetorical questions he asks.  For the most part I put this show on in the background as background noise (creepy background noise) while I'm sitting alone at my desk with my back facing the rest of the room.  Freaky as hell sometimes!
This is a miniseries on Netflix that apparently aired on CBC in Canada and Syfy in the US about a 100 year space mission for 600 volunteers to colonize a planet since the end of the earth is eminent durring the Cold War.  I have to say I've only watched one episode....Zach has watched quite a few.  He tells me I have to get through the first episode and it gets better.  I'm not 100% sold on it because it gets kind of confusing - the space ship (spoilers, its not what you think!  Thanks Zach!) is still stuck in the 60's but the time line is happening now. So you get these confusing parallel times where it is, for example, 2015 but on the space ship their stuck in the fashion & culture of the 60's but the here and now is the here and now.  Another thing I really can't get passed - in this show and a lot of shows - is the glorification of that time.  This is based in 1963 which is not the greatest time for quite a few groups of people.  And since very recently I just can't get behind the glorification of these times.  Anyway...I'm looking forward to watching more, hopefully.

So those are the three things I'm streaming right now, besides my love of watching all the YouTube videos.  I am looking for new series' too so give me your suggestions!

What are you streaming?

xoxo, Moe

8.22.2016

Make it Monday // DIY Planner Dashboard with Rhonna Designs App

I can't stop the planner DIY's guys and I won't stop.  #cantstopwontstop if you will.  At a planner meet up on Thursday we did a dashboard swap and I had the clever idea to use the Rhonna Designs App to design some fun dashboards to trade.  Rhonna Designs is one of my favorite apps for overlays and I've talked about the app before here, here, & here.  I thought it was high time to give this app it's own little post.  This DIY is so easy I made a butt ton of these designs on my lunch break and printed them when I got home!
this post contains affiliate links, please read my full disclosure here.

supplies // Rhonna Designs App, Print to Size App, printer, laminator, laminating sheets, paper, paper trimmer or scissors, hole punch
First, download the Rhonna Designs app.  You may also want to download the Rhonna Designs Suite as well since you'll save a few pennies and have two more awesome apps to work with.  Open the app and select the picture pile in the lower left hand corner of the bottom row of options.  From the next screen, choose a background - this is where having the other apps helps, you can get more backgrounds.  The background can be one from the app or a photo you may already have on your camera roll.
Once the background is chosen, there are options for sizing.  Use your finger to swipe all the way to the left to find the planner sizes.  For this project, I chose the A5 size.  For my dashboard in the photo at the top of the post I also used A5, just sized it bigger in the Print to Size app (mentioned below) and trimmed it down.
After selecting the size dashboard to create, select the starburst icon in the upper left hand corner to add the overlays.  This app offers a ton of free overlays, but I find the cutest ones are a part of the exclusive packs designed by bloggers and digital artists.  You can preview different packs before you purchase them as well.  For the most part 3 overlay pack are .99 cents, a pretty affordable price for the amount of overlays you'll get.  My favorite pack currently are Shine Quotes, Weekday Warrior Icons, and Bright Quotes.
Choose the overlay pack you'd like to work with, then pick the overlay from the slider on the bottom of the screen.  Use the red knob at the lower right edge of the design to change the size.  Use your finger to move the overlay across the page.  There are a ton of color options as well - including foiled and glitter textures.  To add another overlay, tap the plus icon at the upper left hand corner and select the next (or the same) overlay pack.  To add text, select done, tap the T icon at the upper left, and add the text.  Once the design is completed - add as many overlays or as much text as you like - tap done, and then tap the three lines at the upper right hand corner.  Tap share from the bottom of the column, select hi-res when prompted, and save to your camera roll.  Create as many dashboards as you'd like!
To print these guys directly from your phone, download the Print to Size app (be sure to read up on how to connect your wireless printer, my phone picked it up automatically).  Open the app and from the screen tap the + icon at the center of the bottom menu.  Select the image from your camera roll to add it to the canvas.  Use the lower right hand blue knob to size the image the proper size (or bigger if you need to) for your planner dashboard.  Since this is true A5 size, the image should be sized to 5.8 x 8.3 inches.  Tap the printer icon on the bottom menu bar, find your printer, then print on your desired paper.

Once the image is printed, laminate the image according to the settings on your laminator (I use this one by Purple Cow) and use the paper trimmer to trim it to size.  Punch holes where needed and insert into your planner!

DOWNLOAD PRINTABLE A5 DASHBOARDS HERE


If you'd like to get the images I made to print for your planner find them at the link above.  Remember, these images are for personal use only.  Do not sell the design or the finished product.  Do not make and disseminate these in mass quantities.  Do not give this file away - please link to this blog post.  Thanks for playing nice!

xoxo, Moe

8.19.2016

Free Sticker Friday // Etsy Shopping Wallet Stickers

I've decided to rename this little series here on the blog where I offer free stickers every Friday to Free Sticker Friday.  This week's stickers are designed to be cut using the Silhouette - either the Portrait or the Cameo.  I switch weeks from Cricut Ready Stickers to Silhouette Ready Stickers and this week happens to be Silhouette time!
this post contains affiliate links, please read my full disclosure here.

These are great for marking when you've made your recent Etsy purchase but I've also included some plain 'ol wallets to track any spending you might be doing as we come into time for school.  I know there are school supplies to be purchased, clothes, shoes, planners, textbooks.....the list just keeps growing!! I haven't gone back to school in 5 years....and I get a little sad about that each year!

DOWNLOAD ETSY WALLET STICKERS HERE


As always, the stickers on my blog are for personal use only.  Please to do not sell the printed work or the designs, do not offer them for free, or distribute them in mass in any form.  If you would like to share these stickers with a friend, please direct them to this blog post and not the digital file.  Additionally, I'd love for you to pin to this post instead of the digital file on any of your Pinterest boards.  Thank you for playing nice!
If you'd like to purchase sticker paper you can find a lot of choices on Amazon here.  Think you might like to try cutting these by hand?  Check out the Gyro Cut here to help you kiss cut with out a machine.

Enjoy!

xoxo, Moe

8.18.2016

3 Ways to Prepare for a Last Minute Trip

If there is one thing that Zach & I are good at it is spontaneous and last minute trips.  Whether it is a weekend getaway or a last minute day trip, Zach and I love to pack it all up and head out.  This past weekend we went up to Michigan to camp by the pond at his parents' house.  It was a qauzi spontaneous trip because while we'd talked about going, it wasn't really cemented until later in the week.  I love throwing out all the plans and just doing something new, here are 3 tips to help you stay organized when it comes to a last minute getaway.
this post contains affiliate links, please read my full disclosure here

Permanently Packed Toiletries Bag
This has come in handy for a lot of trips, not just spontaneous ones.  A permanently packed toiletries bag that is ready to be grabbed up at any moment saves you one extra step in packing.  I use a pretty compact clean train case style bag (like this one) and stuff it with other little compact bags to keep things separated.  I make sure that I have all the necessities and after a few trips I've boiled it down to exactly what I need.  The little bags I use are small cosmetic bags, ipsy bags, & bags I've gotten other beauty samples in.  They fit perfectly and create a little file system so I know that all hair care is this silver bag, all shower stuff is in this green mesh bag, toothpaste is here, etc.  Having this packed and ready to grab in such a compact way is a time saver.

Know What You Need
Gone are the days where I pack a What If outfit.  No I will probably not have dinner with the queen so I don't need that fancy cocktail dress for 2 nights away.  I try to make a plan of what we'll do and pack accordingly.  Since most of our trips are weekend getaways I try to stick to just one duffel bag.  I always bring a sweater, a 'nice top', two bottoms (shorts or pants, etc), walking shoes, a t-shirt (or two), underthings, & PJs.  You never know what might happen but you can 100% guarantee you won't meet the queen so there is no need for the extra fluff.  Try trimming the fat on your packing for a few trips and see what you can totally live with out.

Trim Down the Gadgets
We are a very hobby & gadget oriented family.  So any time there may be down time you gotta make sure you have something to pass the time.  I love bringing something to work on if there is that time because it is a little bit of home.  But I've learned I totally will not be finishing that crocheted blanket a long with a design project, with a side of some other DIY.  While some free time maybe unexpected - torrential down pour and your stuck at the hotel - it doesn't mean you will have oodles of time in the less than 72 hours you may be gone to do all these things.  Narrow down what you will actually be able to do in that free time - bring the iPad to blog instead of the laptop, or bring just the small project your working on not the whole thing.  This has helped me throw together a fun bag a lot quicker that running around trying to cram a bit of all of my hobbies in.

Spontaneous weekend trips are fun and even if you go only a few hours away keeping these things in mind will help you get on the trip a lot faster.  You'll spend less time packing and more time away on your mini adventure.

Do you have any last minute packing tips?  Are you a fan of spontaneous trips?

xoxo, Moe

8.15.2016

Make it Monday // DIY Happy Planner Bookmarks

I can't believe it is almost time for back to school...some places have even started school already I think!  And if you're in college....you might already be back to it as well.  It has officially been 10 years since I graduated high school, and 5 years since I graduated college.  I haven't gone back to school in a long, long time.  But...that doesn't mean I don't get excited for it every year.  The school supplies, the fresh notebooks, the new clothes, the new back packs....man, I'd really like to buy a slew of new school supplies like right now.
this post contains affiliate links, please read my full disclosure here.

This year MAMBI introduced an academic planner into their line of Happy Planners and I think that is the bomb-dot-com.  They also introduced a new Teacher Planner which is all that and a bag of chips, if I do say so myself.  Last July I shared this DIY cover for your Happy Planner using a cool pocket folder from the back to school section and today I want to share another Happy Planner DIY - DIY bookmarks!  I've been on a roll lately offering up some great SVG files for use with your Cricut Explore, and today's DIY is no different.  Here's how you do it:

supplies :: laminating machine, 3 mil laminating pouches, scrapbook paper,  SVG cut files, Cricut Explore (Circut Explore one or Cricut Explore Air), paper trimmer (optional)
From the Design Space home page, select create new project and navigate to the Upload Images screen from the column on the left hand side of the canvas.  Under the Image section, select upload image and locate where you've saved the SVG file.  Select that file, name it how you wish, and select save.  Repeat for all 3 of the SVGs provided.  (Full disclaimer here - these SVG files have a little something weird with them where they will make extra cuts on the outside of the little mushroom shapes to fit around the disc.  It won't affect the outcome of the project, but you'll see the Circut do some extra cuts and you might be confused.  I'm not a pro yet..and I can't figure out where the cuts are on my file or why they are there.  But don't worry....your project will be fine!)  Add these images to your canvas and size the height of each image to 8.5 inches (keep the proportions locked and the width will change accordingly)
If the scrapbook paper isn't trimmed to fit inside the laminating pouches, trim them down now.  The best type of scrapbook paper to use for this project is double sided scrapbook paper so the design is visible on both sides of the bookmark, but it isn't necessary.  For this project I used 3 different, single sided, scrapbook papers trimmed to 8.5 x 11 inches.  Laminate the scrapbook paper by following the directions on your laminating machine.
From the canvas in Design Space, choose the bookmark you would like to cut first.  Hide the other two images by clicking on the small eye on the layers pane.  Select Go.  From the mat screen, select Go.
Place the laminated paper right side up on to the mat, and feed it into the machine when prompted.  To cut through 3mil laminated scrapbook paper I've found the Poster Board or Poster Board + setting on the knob on the machine to be sufficient.  You may need to play around with your machine to find the best cut setting for you.  Push the flashing Cricut button to cut the project.

Repeat for all of the bookmarks.
The washi bookmark will allow you to wrap some of your favorite washi samples to carry with you on the go!  Snap the bookmarks in where you will need them and you're set!  These are perfect as mini dashboards to stick any important information - class schedules, grocery lists, project supplies, group meetings, etc.

DOWNLOAD THE SVG FILES HERE

(disclaimer - you may see one or more of the files show up 'blank' when you click the link.  Simply download the file and it will show up on your computer.  You shouldn't have any trouble uploading it to design space either.)

These SVG files are for personal use only, do not sell the files or anything created with them.  Do not distribute the files or the end product in mass quantities.  If you would like to share this DIY, please link or pin this post and not the files.  As always, thank you for playing nice.

I hope you enjoyed this little DIY!  Have fun planning and find more Planner DIY posts here.

xoxo, Moe
If you like the content you see here on the blog, please consider becoming a patron!  Joining the Patreon Family as a financial contributor means you get access to exclusive content only for you!

8.12.2016

Free Planner Stickers // Cricut Ready Movie Stickers

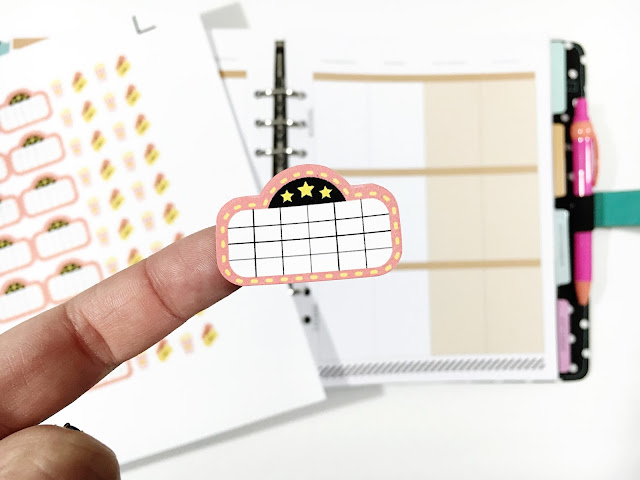
Guys, guys, guys!  I have some perfectly wonderful Cricut ready stickers for you today.  Movie marquees and some other movie related stickers (popcorn and tickets!).  These are so cute for any movies you're trying to catch before the end of summer - or any time really.  
this post contains affiliate links, please read my full disclosure here.

Aren't they super cute?  The marquees are 1.5 inches wide so they will fit the width of your Erin Condren, Happy Planner, or equivalent style planner.  I've even got some free printable inserts here + some A5 and personal size inserts these will fit.  Once the image is upload into Cricut Design Space, size the width to 5.5 inches, keeping the proportions locked (the height will automatically change to 8 inches).

DOWNLOAD MOVIE MARQUEE STICKERS HERE


This file is a PNG file for use with your Cricut Explore, Cricut Epxlore One, or Cricut Explore Air.  However, this PNG can be opened in Silhouette Studio but you will have to use the trace feature to add cut lines.  As with all free printables on my blog, these are for personal use only.  Please do not sell the design or any printed stickers you make from any printables on my blog.  Do not distribute these in mass quantities.  If you would like to share this printable with a friend, please link or pin this post and not the digital files.  I appreciate it!

**there is now a PDF included in the download!**

xoxo, Moe

8.10.2016

3 Ways to Boost your Instagram Photos

I love Instagram.  I love my iPhone.  I love camera apps.  And I love sharing these things with you all.  My Instagram feed has evolved drastically since I posted my first photo.  Back at the beginning of Instagram time my feed was all filters, frames, etc.  And I had an iPhone 4 and the photo quality wasn't that great.
I have a few previous everyday photo tips posts - iPhoneography Tips & Tricks & 5 Photos you Should Take to Improve your Blog Photography.  This post is going to throw some more tips out there too keep in mind 

Practice Different Shots
The more you practice, the easier it will be to take natural photos.  The more photos you take, the easier it will be to find the perfect light, the perfect set up, and the perfect angle.  The more photos you take, the easier it will be to focus on the elements important to a good photo - composition & light.  This post from 2012 shares different angles to play with using your smart phone...but since that post, the quality of our camera phones has gotten exponentially better.  Now your phone has an auto focus so playing with depth of field and exposure is easier to do from the native camera apps however the iPhone app Warmlight allows you to manipulate focus and exposure over different points of the photo.  So you can focus on one point but adjust the exposure based on a second point.  You can't do that in the iPhone's native camera app!  This will help you adjust for the perfect light!

Use Natural Edits
I've talked to death my favorite apps for subtle edits, but I'll share them with you again - Afterlight, Snapseed, and A Color Story (read all about them here).  All of these apps add subtle effects such as brightness, color correcting, and sharpness with filters and adjustments.  Both Afterlight and A Color Story allow you to save custom filters or custom edits for use later on similar photos.  I love to use these two after adjusting specific areas for brightness in Snapseed.  Additionally, the subtle effects can really offset any weird coloring on your image.  For example, in the A Color Story app you can adjust the temperature easily with a slider under the adjust tab but there are also subtle filters that will correct color temperature.  When ever I take a photo that may appear too yellow, I use the Essentials filter On Lock to brighten, whiten, and correct the temperature of the photo.  (The only filters you really need from this app are in the Essentials collection, and I believe all of those are free!)

But Don't Be Afraid to Add Something Fun
Forget the overprocessed filters and light leaks and try to add something subtle.  In the A Color Story & Snapseed apps there are subtle filters to add grunge, light leaks, and color concentration.  This is adds a cool summery effect but us it in moderation!  Again, the A Color Story app is the best for subtle edits and overlaying a tiny light leak in the perfect spot creates a fun, natural effect.  These things did happen (light leaks, that is) but in order to add a bit of whimsy to your photos, be sure to add them in a place that makes sense for the composition of the photo.  It shouldn't distract from the subject or be so intense that it takes away from the focus of the image.  Just add a touch of flare.

I hope these tips have helped you think more about your Instagram feed and overall photography in general.  You can take these tips and create a carefully curated camera roll just for yourself. You don't even have to apply this to Instagram!  If you'd like to read more iPhoneography tips, click here.  And if you'd like to see my filming set up (spoilers, I film on my iPhone too!) check it out here.

What do you share on your feed?  Any more tips?

xoxo, Moe

8.08.2016

Make it Monday // Apple Crochet Cozie

I hear we are nearing back to school time....and I have to say I am excited!  I am not going back to school, nor is anyone I know, but I can't help but get excited about it.  So in honor of back to school time I wanted to share with you some project inspiration.  A back to school inspired, Apple Applique crochet cozie for your coffee cup!
I'm no good at writing patterns but I did loosely follow this coaster pattern and then I crocheted in the round until I had a tube that would fit around the cup and fit the applique.
I hope this inspires you to make some crochet cozies of your own.  If you want some more themed cozie inspiration, click here, here, and here.

xoxo, Moe

8.05.2016

Free Planner Stickers // Happy Unicorn Stickers

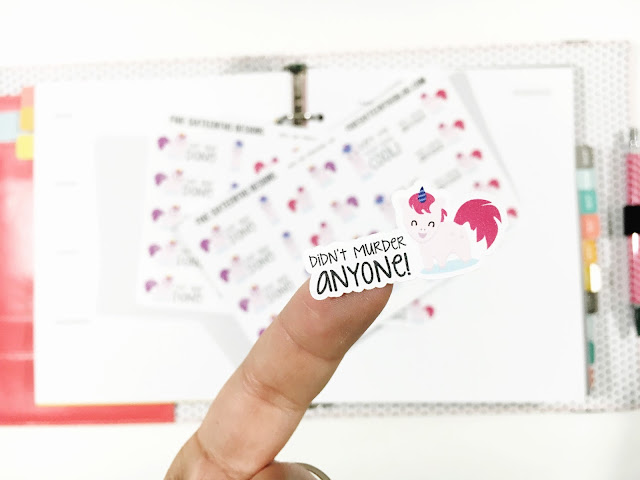
In my memory planner I use a lot of decorative stickers.  In face, a lot is an understatement.  My favorite thing to do is use a specific type of sticker to mark down a specific type of event.  For example, the stickers I'm going to share with you today are stickers I use when I've had a particularly crazy or stressful day at work.  I  use these because they are hilariously happy unicorns with a creepy stare. 
Some of these stickers have some bad words, but the celebrate the fact that I made it through the day....and didn't murder anyone.
One of my favorite times I had to use this sticker was when someone in the office put soap in the Keurig.  Why did someone do that?  No idea...but I spent a good chunk of time brewing up mini bubble baths in Styrofoam cups to clean it out.  Wonderful morning at work!

DOWNLOAD HAPPY UNICORNS


So if you'd like to down load these hilarious stickers, click the link above.  There is both a PDF and a Silhouette file.  As always, these printables (and all printables on the blog) are for personal use only.  Do not sell the design or printed sticker set, do not claim this as your own, and do not print and distribute in mass quantities.  If you would like to share these with friends or pin to Pinterest, please pin or share this blog post.  I'd appreciate it.  Find more printables here!

xoxo, Moe

8.02.2016

Trend Tuesday // Summer Lovin

It has been a long, long while since I've shared a board I've created on Polyvore!  Like, a loooooooooooong time.  But today I've got some things I've been loving this summer in a lovely little collage for your viewing pleasure.

SUMMER LOVIN
find this set on Polyvore here.
this post contains affiliate links, please read the full disclosure here..

I've been loving some harem style pants for the summer.  I actually picked some up from Meijer a year or so ago and didn't wear them until this year.  I find that they are super comfy!  I like the patterns so I pair it with a white shirt.  I picked up some Birkenstock-esque sandals from Walgreen's of all places and love how comfy they are.  They are actually the inspiration for this post!  I've also been living in some easy slip on flip flops like these rubber white ones.

When it comes to storing my planner stuff, I have a new planner bag.  It is the pink variation of this blue bag from Crown & Ivy, sold at Belk.  I picked it up over my vacation in North Carolina for my family reunion and love it.  it has so much room, plus there are pockets on the outside!  I love that it is so colorful and roomy.  Easy to carry too!  I just took a peak on the website and Belk is a part of Ebates rewards!  (At the time I'm writing this it is 4% cash back.)  So don't forget to either activate your cash back or sign up here for some additional savings!

I'm also digging one of my old time loves - Claire's!  I picked up a few fun phone cases before my recent vacation and I want to pick up more!  I don't currently have the hot dog, but I do have a fun cactus with glasses, some sushi, and some french fries.  Unfortunately they don't fit the iPhone 6 plus though.

Finally, I'm digging this L'Oreal contour palette from the drugstore.  I love how it applies and how easy it is to blend.  I've been loving topping the harsh contour with a light bronzer, like the Milk Chocolate Soleil Bronzer from Too Faced.

What are you loving this summer?  Any top beauty picks?

xoxo, Moe

8.01.2016

Make It Monday // DIY Sushi Bookmarks with the Cricut Explore

If there is one food I'm very fond of...it is Sushi.  There is one grocery store down from where I work that offers a little grab-n-go type situation of sushi and I love to stop in every now and then.  I haven't found a Sushi restaurant near me...but there's not much near me but chain restaurants.
This post contains affiliate links, please read my full disclosure here.
When I found these little sushi images on FreePik.com I knew they would make the perfect fun little bookmark!  I've been trying for ages to come up with a way to share how to make a magnetic bookmark using the Cricut Explore.  The main thing I was struggling with was how to make it durable.  Today I'm pleased to say I've come up with a solution.  I do hope that you try this tutorial out and let me know how your bookmarks come out!

Supplies :: magnetic tape, printer paper, 3mil laminating sheets, scissors, laminating machine, Cricut Explore (or Cricut Explore Air, Cricut Explore One) + cutting mat, sushi PNG image (at the end of the post) 

Shop the Supplies on Amazon Below!

Upload the sushi PNG image to Cricut Design space.  I always select Complex Image when I upload an image because I think it preserves the best quality.  This PNG will only need a little clean up to remove the branding and licensing information.  Add it to a new canvas and size it to be 8 inches tall.  (Keep the proportions locked, the width will adjust automatically.)  Select the Go button at the top and print your image on regular, thin printer paper.
Once the image is printed on regular printer paper - you may need to select the best print quality your printer has to get a crisp image - slip it into the 3mil laminating sleeve and trim the sleeve around the registration marks.  This will allow the Cricut's sensors to read the marks more easily.  Run the pouch through the laminating machine per the machine/pouch's direction.
Now that the full page is laminated, set the dial of the Cricut Explore to Poster Board, load the mat, and click the flashing Cricut Button.  This will cut out the shape of the bookmark.  You'll find that the Cricut reads the registration marks normally as long as you've trimmed enough of the laminating pouch away from them.
Carefully fold each bookmark in half making sure to match up the ends.  Using the edge of the scissors handle, create a crisp fold.  To make the magnetic tape a bit stronger, cut two lengths of tape about .5" long then stack them on top of each other so that one side is still sticky then stick that side down to one side of the inside of the bookmark.  (Hold one .5" piece of tape with the sticky side down.  Place the second .5" piece of tape sticky side down on the top, non sticky, side of the first piece)
Repeat the same process - double up the magnetic tape so that only one side is still sticky.  Flip this piece over so that the sticky side faces up.  Place the smooth magnetic side against the smooth magnetic side of the previous piece.  They may not line up, but that is fine.  As long as the sticky side is up.  Then press the top piece of the bookmark to the sticky side of the magnet facing up.  You should end up with a the magnetic pieces sandwiched between the two sushi images.  This should open and close easily.  Repeat this process for the two other bookmarks.
These bookmarks make great gifts for your planner friends or friends who love to read!  How cute would these be for back to school?  I plan on giving these as a gift and keeping a set for myself!

The best part of this is that the laminating isn't too thick so that the magnets won't stick.  Doubling up the tape makes it a bit stronger.  The printer paper also helps to keep the thickness down so the magnets will stick to each other.  I also plan on having a few other free bookmark templates available in the future so you can repeat this DIY for varying seasons and themes!  Love it!


If you've been thinking 'Well I'd love to do this with my Silhouette.' or if you've been thinking 'I'd love to just cut these out by hand,' I've got you covered.  Click the link above to find the PNG, PDF, and Silhouette file.  I can't make any claims on how the the blade of your Silhouette will cut through laminate..nor do I know if you'll need a deep cut blade.  That is why I love my Cricut....it really is the best for paper crafting because I know it can cut through thick(ish) materials.  I make dividers like this all the time!  Remember, all printables on the blog are for personal use only.  Do not sell the design as is or the end product.  Do not distribute this in mass quantities either.  If you would like to share this post, please pin or share the blog post only and not the linked files.  As always, thank you for playing nice!

Hope you enjoy!

xoxo, Moe
If you like the content you see here on the blog, please consider becoming a patron!  Joining the Patreon Family as a financial contributor means you get access to exclusive content only for you!