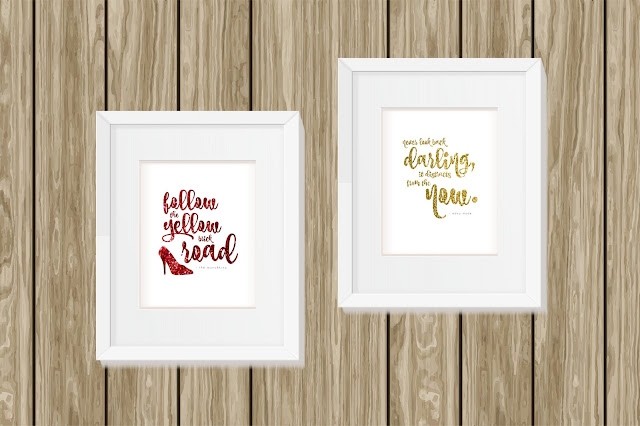
Holy cow, Batman! Another PicMonkey tutorial! Last week I shared a post on how to offer free printables on your blog and today I want to follow up with some inspiration to create a free printable (plus offer one to you!) It's like free printable-ception - a printable with in a printable....but let's get back on track.
If you've been under a rock for the past few years you may not have seen that glitter is the new Gaga - glitter is everywhere! And I don't mean that glitter has exploded all over your craft room, I mean glitter has exploded all over design! So today we're going to use PicMonkey - the simplest, yet most amazing online design tool - to create a super cute glitter text graphic for your wall!
First, start off with a blank canvas by hovering over the design tab and clicking on 8x10. Make sure the canvas color is set to white if it isn't already.
Navigate to the text pane and add your quote. One of the greatest things about PicMonkey is that you can use your own fonts, for free, straight from the website. If you don't have any cool fonts installed, don't fret - PicMonkey offers an array of fonts for free. But there are even more fonts, overlays, and effects if you sign up for the Royale feature ($4.99/month or $33/year). It is totally worth it!
I used the fonts Coffee Break (a royale font) and Geo Sans Light to create the quote on the canvas. You could also add any overlays or dingbat fonts (see this tutorial here) to your design. Be sure all text and other design elements are set to black.
Once the design is finished, navigate to the Overlays pane (the one shaped like a butterfly) and select Choose Your Own from the top. I downloaded this gold glitter image from Designs by Miss Mandee for this project so feel free to pop over there and download it for yourself. From the Your Own menu, choose My Computer and locate where the glitter image was saved. Select the glitter image you will use and click open.
The glitter image will appear smaller on the canvas but simply drag the circles one either corner to expand the image so that the glitter covers the entire design on the canvas. Rotating and scaling can be done in a following step, right now just be sure the glitter image covers the entire black design on the canvas.
Next, from the overlays window that pops up once the overlay is selected find the Blend Modes drop down menu and choose Lighten. This is where the magic happens - immediately you'll see that your text is now glitter! Now you can rotate and scale the glitter image to your liking.
I move the glitter image up a little bit so that I could grab part of the design (the attribution of the quote) and bring it to the top. The smaller stroke text doesn't really work well with the glitter texture so bringing it to the top and leaving it black adds to the design.
You don't have to do this with a glitter texture image - you can use any photo you'd like.
Now save your image. You can crop if you wish to create different sized images (great for journaling cards or planner dashboards - remember the iPhone 6s crop size is the perfect size for a personal sized dashboard)
I've made two free 8.5 x 11 printable images for you using this method - both inspired by my word of the year Forward (read more about my word here). One is an Edna Mode quote (I love The Incredibles!) and the second is inspired by my favorite movie The Wizard of Oz. For the Wizard of Oz image, I found the red glitter here.
Download them both here.
Feel free to print these and hang these up as inspiration, but do not resell (printed or digital) as your own, do not redistribute for free on any websites. Please play nice, these are for personal use only. If you'd like to share these please link to the blog post so others can learn how to create some really graphics!
xoxo, Moe


Thank you soooo much! This is one of the best things i've learned so far this year :).
ReplyDeleteOMG! I love it! Love it! Love it!
ReplyDeleteCan you take out the background so you can add it to other things with a different colored background and it doesn't have the white background?
sorry for the late reply to this!! You may be able to do that but in a different program. I don't think that PicMonkey has the ability to smart erase a background....hope this helps!
Delete