5.29.2014

Coastal Scents Revealed Palette Review

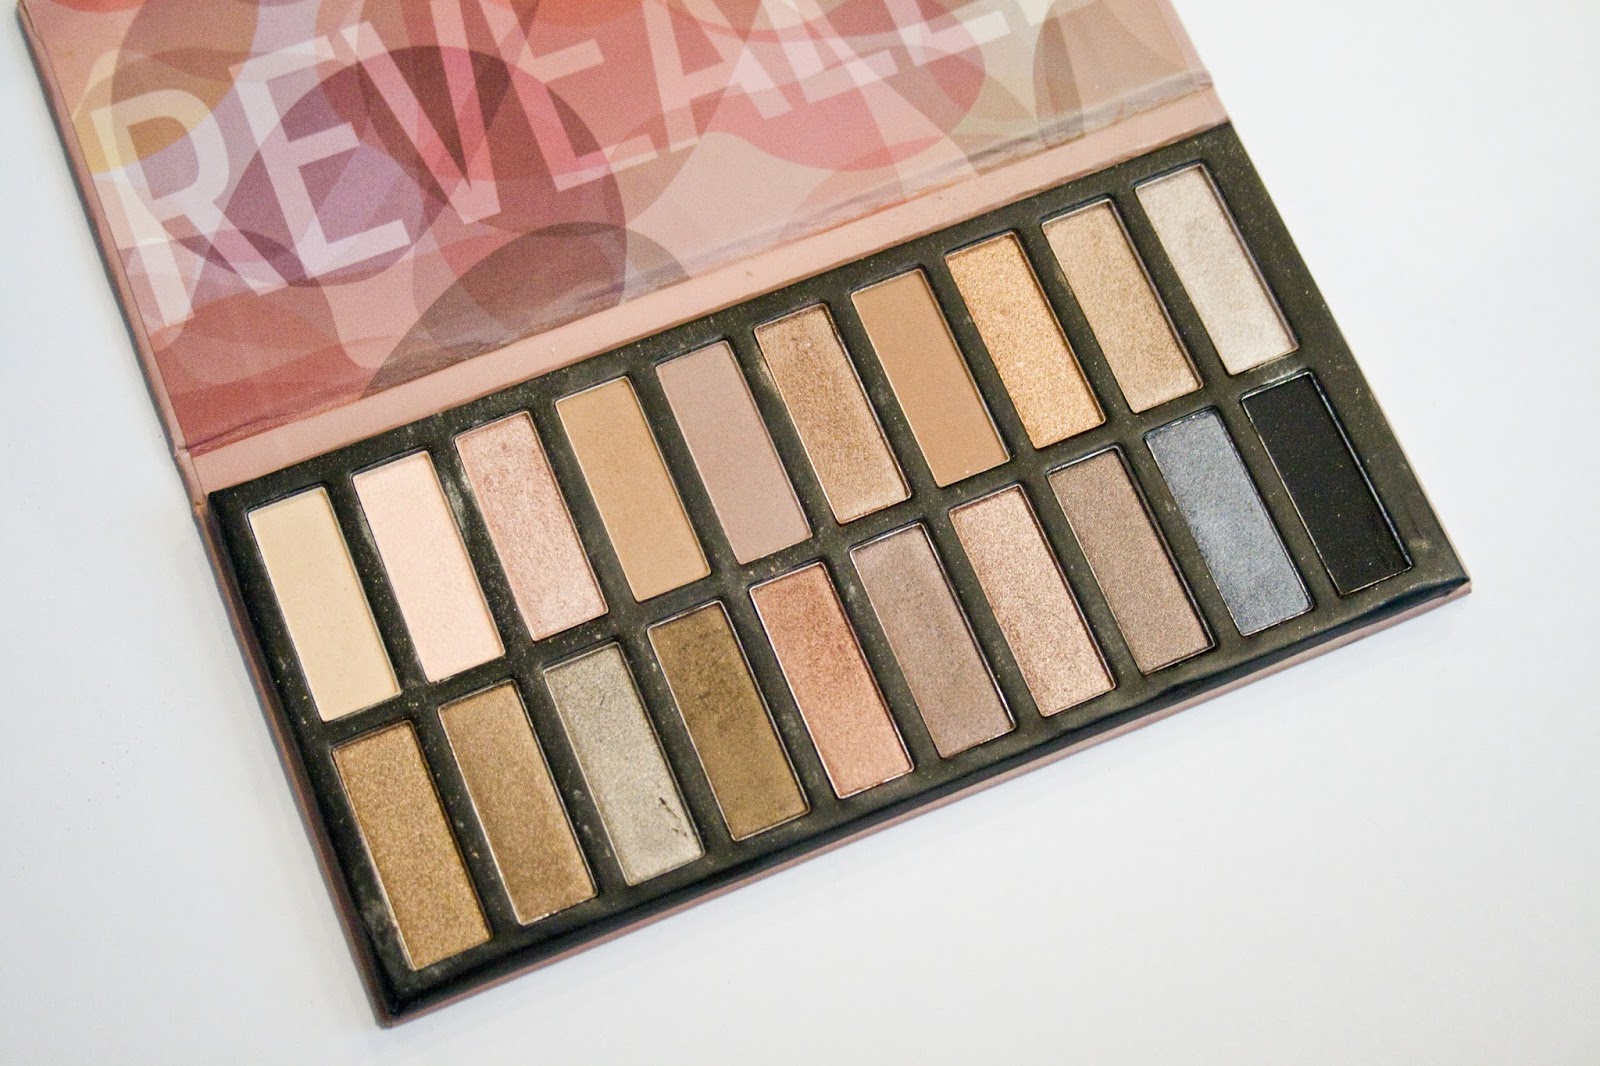
Happy review time again!  Today I want to share some thoughts on a really awesome eyeshadow palette for you today - the Coastal Scents Revealed Palette.  This is a palette that is super affordable & very comparable to the Naked palettes from Urban Decay.  I love this palette because of the colors & because its so slim it's easy to travel with!
From the Website
Smooth powdered shadows.  Easy to blend.  Slim palette with twenty shadows.  Not too much info from the website there but they have quite a few pictures!  Information taken from the Coastal Scents website here.
First Impression & Application
This palette arrives in a cardboard box (a thinner cardboard box, like a standard little protective box) & the palette itself is made of thicker cardboard, something reminiscent of the Naked Palette or the Lorac Pro palette.  A stiff, durable cardboard that makes the packaging slim yet protected.  This cardboard can get dinged up from traveling but its not going to fall apart.  Additionally there is a strong magnetic closure for being a cardboard palette!  I'm not worried about this popping open in my makeup bag.  There is no mirror in this palette which disappointed me when I opened it because there's a huge surface area for it.  There is a plastic protector over the top of the shadows that you can keep in the palette or remove.  There are no color names however.  The twenty shadows come in two rows, are set in metal pans, and set into the cardboard.  They are pretty close together but the pans are big enough that you're not going to cross contaminate the colors.  Of the twenty colors 5 are matte - a nice beige highlight, 3 medium brown blending or crease shades, and one dark matte black.  The rest are shimmery.  (When I look for a palette matte blending & highlight shades are the keys - see my what to look for in an eyeshadow palette video here.)

As for application, these shadows are all very smooth.  They blend nicely together too.  I love using this palette because it's nearly effortless to get an awesome look.  All of the neutral shadows can give you a multitude of wonderful looks.  Since there are twenty shades it's most comparable to having a set with both the types of colors from the Naked & Naked 2 palettes.  The top row has warmer colors & the bottom row has cooler colors.  You can layer, blend & pack on color until you're hand hurts.

Wear Time
I find that these eyeshadows were wonderfully with a good primer.  I can go for the most part of a day at work (about 8 hours) with the color on my lids.  Around the 6-7 hour mark they start to be noticeably fading & creasing.  Not in a bad way.....actually if you're looking at yourself in the mirror the color is still noticeable but a little faded in the crease.  The colors are vibrant and really impress me with their wear time.
Here you can see the shimmer coming out in that copper color

Overall Impression & Recommendations
This palette is super versatile & great for travel.  If you love neutral shadows but you don't want to pay for Urban Decay's Naked palettes, this is a great option.  The colors are vibrant, easy to blend, & the lasting power is pretty impressive.  You can get a variety of looks from this single palette and recreate any looks you've seen done with the Naked palettes.  And at $19.95 (but it's often on sale, sign up for Coastal Scents emails!) it is ridiculously cheaper that two of the Naked palettes!

Purchase you're Revealed palette here.

xoxo, Moe

**This product was purchased with my own money & I wasn't compensated for this review**

Connect on Twitter // Follow on Pinterest

5.26.2014

Make It Monday // Simple Single Bead Pendant Necklace

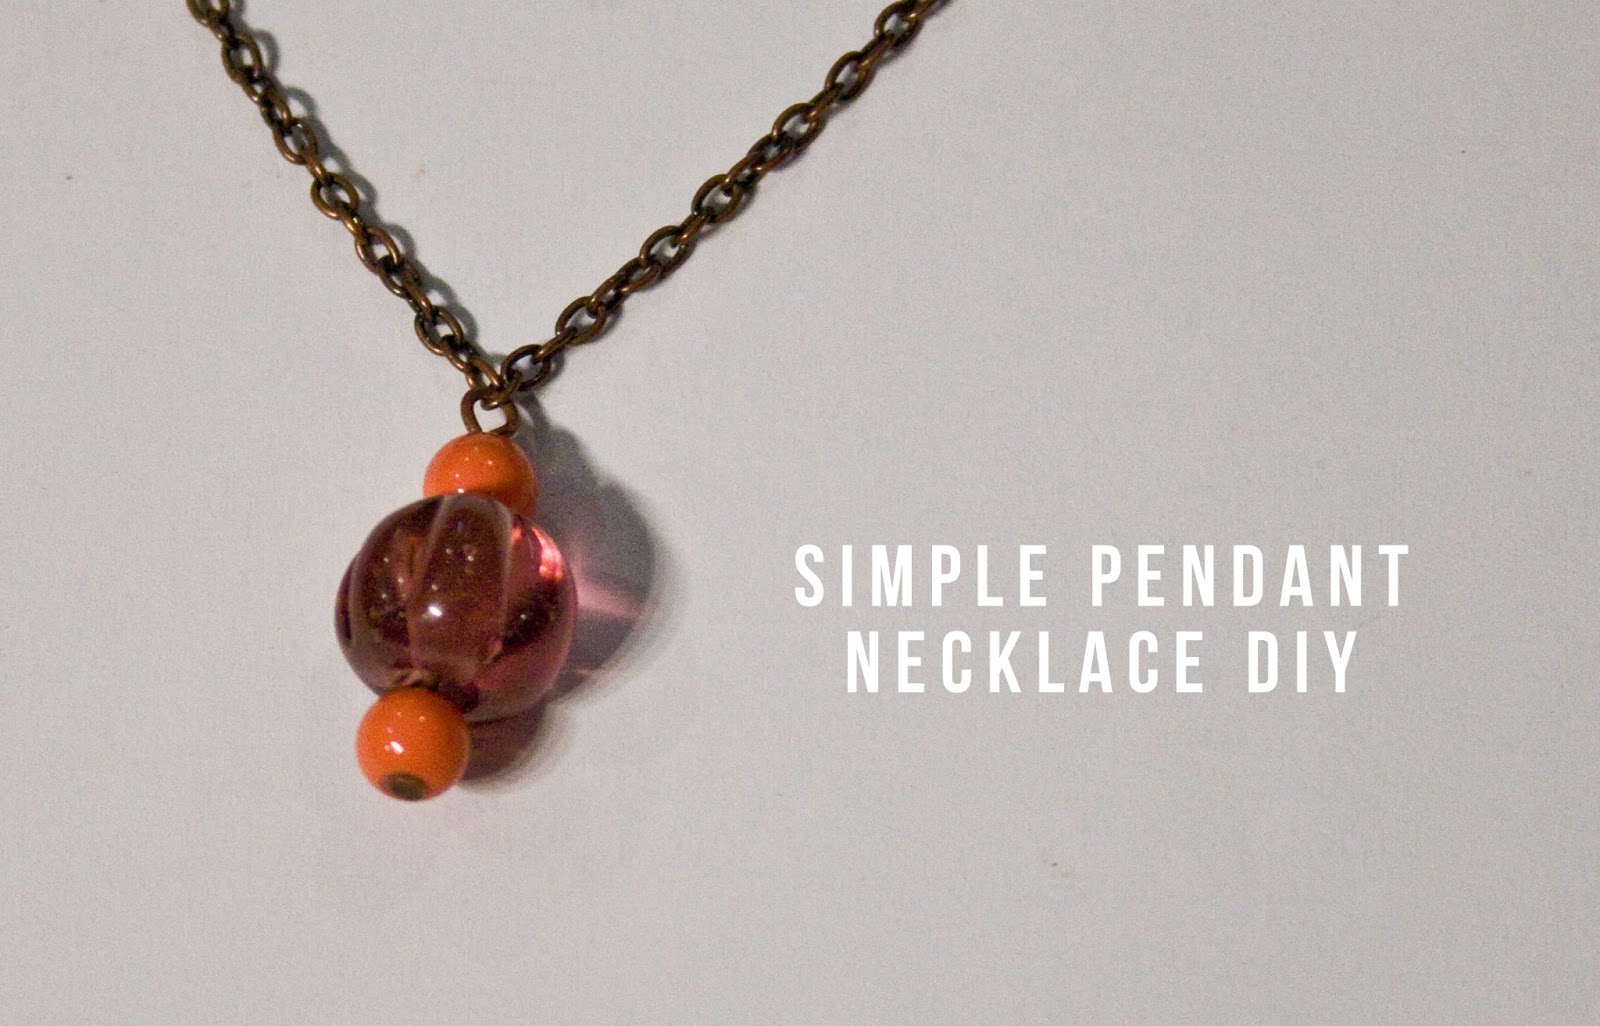
This isn't a particularly challenging DIY - it's rather a beginner project.  When I was in high school, I was a part of a little after school beading club as we called it where I learned some basic techniques for beading.  Specifically I learned about how to use & cut a head pin and how to open a jump ring properly.  This little tutorial features both of these techniques as they are key in making any jewelry you make durable & professional looking!
So first off, sorry for the quality of these photos...I feel like my camera & I are fighting.  For the life of me I can not get a good photo.  It's too dark, too blue, too something & I can't get it right.  But anyway, here are the supplies you'll need:
Supplies:  length of chain, three beads, head pin, two jump rings, clasp of your choice, wire cutters, needle nose pliers.
The bead I chose to be the focus of my little pendant was one I picked up over the weekend from an SCA event.  We headed down to Tipton, IN for the Crown Tournament and there, scattered throughout the 4H center where the event was held, were beads for the populace to find.  These were beads created after   I found one hanging on the back of the bathroom stall, which was kind of weird.  But I learned that this type of bead - a viking style bead from around 900 AD - is called a melon bead.  First beads were made from clay & covered with a silica substance.  Once it was discovered exactly what was happening with the silica on the beads, glass beads were made.  I was told that purple beads during this time period were always translucent.  It wasn't until later that an opaque purple was made.  So to showcase this bead in a wearable piece of jewelry I decided to make a simple necklace!
First you'll need to gather your head pin & the three beads.  There should be a center bead (like mine from the SCA event) and two smaller beads.  The two smaller beads here match for symmetry, but you could choose whatever you like.  Make sure the smaller bead on the bottom has a hole small enough to keep the beads on the head pin.  If the bead has a hole that is too big, the head pin will slip right through.
To create a perfect loop, fold the remaining wire of the head pin at a 90 degree angle as close to the first bead as you can.  This will give you a more professional looking loop to which you can attach your bead to your length of chain.
Next, trim the rest of the head pin so you can create your loop.  I've found that using my fingertip as a guide works for me.  I hold the 90 degree angle of the pin about 1/3 of the way down my fingertip & trim right at the edge of my finger tip.  This gives you enough wire to turn into a loop.
Now, using the needle nose pliers, roll the wire back towards the top bead.  Place the edge of the wire  right in the middle of the prongs of your pliers.  Make sure the bead is dangling downward from your pliers & roll your pliers over hand towards the top of the bead.  This creates a professional loop with a nice bend at the neck of the loop.
Measure your length of chain & trim it.  To add your clasp, open your jump ring by holding the ring with the slit opening facing up between your forefinger & thumb.  With your needle nose pliers grab the other half of the ring (next to the slit opening, mirroring the way you are holding the ring with your finger & thumb).  Instead of pulling outward & stretching the ring your will pull the half of the ring you are holing with the pliers towards yourself.  This will maintain the strength of the jump ring.  Add your chain to one jump ring & close by holding the ring the same way as before & pushing the two halves back together.  Try holding the ring in your pliers while you slip on the chain, then grab the half of the ring you were holding before & use your pliers to push backwards.  Open your second jump ring the same way, add your chain & your clasp, then close it up.

To add the bead pendant you can open the loop you made in the same was as the jump ring & slide it onto a single ring of your chain or if the loop is big enough you can slide it onto your chain before adding your jump ring & clasp.
Now you have a simple beaded pendant that incorporates simple wire jewelry techniques to make your other jewelry products look crisp, durable, & professional.  This is a great way to showcase a memorable bead like the one I found this weekend!

Thank you for putting up with the crappy photographs!  Who knows when I'll get back on track with my camera!

xoxo, Moe

Connect on Twitter // Follow on Pinterest

5.21.2014

Wednesday Decor // Nail Polish Collection & Storage

Hooray for another peak into our home!  I think I'm giving you these peaks right now knowing that in a few months we may be doing renovations on the upstairs.  Hopefully we'll be adding another bedroom with a walk in closet & a cool little laundry room expansion type of deal.  I know I said a while ago I was going to do a little laundry room make over - well I sorta did it then I put off the rest.  If it's going to change I didn't want to spend time & money on it to have to redo it later!
A while ago I posted the above photos on Instagram (follow me @fivesixteenths!) and today I wanted to share with you what I actually did with all my polishes!  I first posted about my nail polish display/collection here way back in January of 2012!  Since then I've moved & changed it a little bit.....and now I changed it a little bit again.  This post today is going to be a bit similar to this post I did previously about the perfect manicure kit in the sense that I still store my nail polish in baskets.  But I've stepped up my game a little bit & made it a bit fancy.  Peek below to see!
If you don't like seeing bathrooms - avert your eyes, especially because there's a toilet brush in there!  But I store my nail polish collection in the bottom of these three baskets in a skinny 3-section bookshelf.  This little shelf is from Target, it's about $14 and you can find these all over the place especially around move in time for college.  If you're curious - feminine products are in the middle shelf & extra TP is in the top shelf.  Just keeping it real here.  These baskets are from Target & currently on Clearance in the store as well - I can't find them online so I hope they are still in store!  I bought the bottom two full price then found the 3rd one on clearance later.
I love these baskets because the style came in different sizes & this smaller tray.  (This could totally be DIYed with a smaller tray/basket & two leather straps attached.)  This tray stacks neatly on the top of the basket and it still fits in the shelf.
In the tray I keep all the things I would need to do a manicure so I can fill the tray & take it with me.  It acts as a carry all & catch all and as a hard surface, if I need one, when I do my nails.  I wish I could link for you this little pink tray (behind the pink & black heart pouch) that is awesome for setting between your legs & using as a little table to paint your nails on....but sadly it was a gift ages ago & I can't find one.  It't pretty cool because it fans out & holds three polishes....just in case you're painting your nails on the couch or in bed.  In the pink & black hear pouch is also something I can't link because Icing discontinued their Base & Top Coat that I looooove.  I have like 5 back up bottles!  In that pouch are some of those Icing top coats & various other drug store top coats.  I like to keep those separate so I don't lose them in my polish collection.  Then I have some of my favorite polishes, nail clippers, files, lotion, & my nail brush.  I can pick all this up & take it to where I plan on doing my manicure then wrangle it all back together to put away.
Then in the big basket I store all my polishes, extra files, my nail file/drill thing (scary!), a tub to soak my hand, and nail polish remover.  As you can see from the images at the top of the post I threw out a lot of my old polishes.  I haven't bought a new one in a loooooong time!  But most of my collection is from Claire's & Icing's because I love the formula.  There's some Zoya & Nailtini from Ipsy bags, some Sally Hansen, Revlon, & L'Oreal.

It all fits so nicely in this little set up that I'm super satisfied!  Hopefully you can find these at Target now but if not, the tray is very DIY-able.

How do you store your nail polish?

xoxo, Moe

Connect on Twitter // Follow on Pinterest

5.20.2014

Trend Tuesday // Glowing Face Products for Spring & Summer

There are some awesome drug store price highlighting & glowing products coming out for the summer months this year.  I know there's a little bit of controversy on glowing face products in the summer - do you really want to look glowy in a season where sweat is prevalent?  But I feel like Spring & Summer are the months when your skin is the brightest after a dull winter & the glow just adds to the over all healthy look of your skin.  Personally, I like a softer glow to my skin.  Below are some bright highlights and softer glow products.
As you can see there's a ton in this little box!  All these products are from the drug store and there's a lot...so I hope you have a cup of coffee ready, you'll be here for a bit!
These two products are from Hard Candy Cosmetics found either on their website or at WalMart stores.  On the left is the So Baked Bronzer in Tiki.  Much like the Wet n Wild Color Icon Bronzer in Reserve Your Cabana (also in this list) this isn't really a bronzer but more of a peachy, skin toned highlight.  The blurry swatch is on the left in the last picture.  I love this one for a subtle, highlight glow.  If you can pull it off, you might be able to use this as an all over setting powder.  Both Reserve Your Cabana and the So Baked Bronzer in Tiki remind me a little bit of the Hourglass Ambient Lighting Powders.  I'm too oily to use it all over my face but if your skin is dry, this might just give you the all over brightness you're looking for.

On the right is the Hard Candy So Baked Contour Trio in 3rd Wheel that features a highlight, a blush, and a bronzer.  The highlight, swatched on the right in the last blurry photo, is a light pink-champagne highlight.  I also love this as a pretty soft glow.  The blush is a nice rose glow pink & the bronzer has a sheen (it's not matte).  My favorite of the three sections is the highlight which is why I'm including it in this post.  There are four shades in the Contour Trio line and 3x a Charm looks like the bronzer might be light enough to use as a highlight as well.
I'm not sure why these are called shimmer palettes because it's just one pan of one product but they sure are beautiful.  The first one I feel in love with was Rose Champange Glow - I liked it so much, I bought a back up for fear of it being a limited edition product.  There are three permanent Shimmer Palettes - Rose Champagne Glow, Rose Golden Goddess (swatched on the right in the bottom photo), and Carnaval in Rio.  The picture above features two of the Limited Edition Shimmer Palettes for Summer 2014 and I have to say that Video Bomb - the marbled, peachy pink palette in the top two photos is my new favorite.  The palettes in the top two photos, clockwise starting from top left are Rose Golden Goddess, Photo Bomb, & Video Bomb.  Both Video Bomb & Photo Bomb are the limited edition colors.  They are so gorgeous I had to throw them in here.  The bottom photo with swatches from left to right are Video Bomb, Photo Bomb, and Rose Golden Goddess.

These palettes are huge so you'll have them for ages but they are versatile too - use as a highlight or eyeshadow and Rose Golden Goddess & Carnaval in Rio could be used as blushes.  I have one of my first ever YouTube tutorials using the permanent palettes for a Summer bronze look here.
This I've had for ages - I didn't share a picture of the packaging closed because nearly all the writing has rubbed off & the clear top is so dusty!  But this is the perfect nude chanpagne, skin toned highlight for me.  I love the way it sits on the cheek bones!  All of the Color Icon bronzers have SPF in them so if you could use this all over your face, you'd get a dose of your SPF.  Having SPF means it also expires.  My current one will expire this November but as you can see the sun detail on the right side of the product is still nearly intact and I feel like I'm never going to get through it all.  I use this as a subtle highlight on the cheek bones so it's going to take me ages to get through.  I'm not sure if the expiration date purely means the SPF is done or that I shouldn't put this on my skin any more period.
Elf Shimmering Facial Whips
These are the most affordable highlights ever!  These Facial Whips as they are called are $1 at places like Walmart & Target, and even the Dollar Store.  There are quite a few colors here but swatched above from left to right are Lilac Petal, Spotlight, & Toasted.  Currently Toasted isn't available on the Elf website...but thats where I got mine.  They are a whipped, cream type of product and squeeze from the tube in little pearl shaped dollops.  Each of them will sheer out to be the same general color & I find the best way to apply them is with a stippling brush (Elf has a small stipple brush great for that).  Even thought Toasted isn't available now it's a great product to mix into your foundation for a luminous glow. 
Maybelline Master Glaze Blush
These are a new product & with each collection, Maybelline is coming out with more & more colors.  The two pictured above are limited edition in Nude Rebellion & Barely Pink but each of the Master Glaze Blushes offer a bit of glow & shimmer.  The lighter shades are perfect for a highlight but for a little glow from with in use these under your powder blush.  I like to apply my liquid foundation then put on cream products - like cream blush - and then put on my setting powder, then top it with a little blush.  This will intensify the color but also give you a little glow under a matte blush.

All of these glowing products hit all the price ranges!  If you're not familiar with highlights, give these a go.  Additionally, try a cream highlight if you haven't...they are nice too.

xoxo, Moe

Connect on Twitter // Follow on Pinterest // Peep me at Hello Cotton

5.15.2014

iPhonography Apps I Love // A Round Up

Whenever Summer time comes around - or really whenever warm weather comes around - I fall back in love with my iPhone camera.  I've done many posts on the blog about apps I love to use to make the most of my photos & I thought I'd do a small round up just as a refresher.  I plan on searching out & finding some great new apps for the summer, but here are some oldies but goodies:
Here's a post with 4 Collage Apps for your phone.  The picture above was done with DuoMatic....I think I'm going to play around with this app again here soon!
Why not try out photos only in Black & White?  Here's a post with a photo round up but a lot of apps will have a B&W option.  Try opening photos in multiple apps & see what you get!
My favorite photo tip for beginners is the Rule of Thirds.  If I'm not mistaken, the built in camera on most smart phones has a grid option.  Turn that on & follow the steps in this post to learn about balance in your photographs.  Composition is key & this grid will help you create stunning, balanced photos....even if you're no photog!
This post will show you how to use the Camera+ app to create stunning photos for your blog.  This was one of the first apps I fell in love with!

Hope your summer photographs come out great!

xoxo, Moe

Connect on Twitter // Follow on Pinterest

5.09.2014

I'm A (New) CVS Couponer // Saving Money on Drug Store Make Up

Do you ever have something hit you and all of a sudden you're all over it?  Like it's suddenly the best thing since sliced bread & you don't know why you've never been into in before?  Well recently that happened with CVS coupons.  Now, my favorite drugstore is Walgreens...no real idea why.  I attribute it to like the feeling I have when it comes to Coke over Pepsi (definitely Coke) or the fact that I will only go to the Tire Barn in my town because they've always helped me with my tires - it's a mix of preference & habit.  I just feel like Walgreens understands me.  CVS just isn't my jam.  But you know what is my jam?  Saving money.  And CVS has the easiest to understand coupon system.  So I'm in love now.
Recently I threw away a $3 Extra Bucks coupon and was devastated.  Isn't that how you know you're in love?  When you lose something & just die a little inside?  Well, I'm in love with CVS coupons.  So, as you know, I've been really digging the cosmetic industry lately and as it goes into Summer I really want to try all the new products from various drugstore lines.  I've made a resolution to only buy makeup if I have a coupon or there's a really good deal in the store.  If you're interested in saving a significant amount but you're not ready to have TLC come to your house to film a show about you...CVS is a great place to start.  Here's what I've learned so far - keep in mind these are things I've learn as I've just gotten into CVS coupons...so I'm no expert!

Sign up for their rewards card - Not only do you get coupons at the end of your receipt but you can scan your card at their little coupon box & get other coupons (like $5 off $15 or $3 off a Physicians Formula product, etc).  You can also earn Extra Bucks if you're a part of their Beauty Club (I believe you have to sign up for that separately).  It's just pretty fantastic to get like free money to shop around with!  If you register your card you'll get coupons in emails too.

Extra Bucks are like money in the bank - CVS has deals every week where if you buy so much $$ of a certain brand or product you get Extra Bucks back.  These print at the end of your receipt at check out & usually expire in a month or so.  So literally, after shopping, you have money to spend on your next trip.  You can maximize your Extra Bucks by using those bucks on other products that have Extra Bucks rewards as well, the next time you shop.  So you're walking into the store with $5 in your pocket!  That's what sold it for me...I was cleaning out a few of my purses & found a lot of Extra Bucks receipts that I just didn't use and didn't care about!  Man...that was money in the bank!

Coupons at CVS are easy, it's not a waste of your time - Even if you just use the Extra Bucks rewards randomly & don't purposefully purchase items that give Extra Bucks....it's not a waste of your time to tear off the bottom of your receipt & save those Extra Bucks for later.  You can take couponing as far as you'd like, but simple money in the bank as I see it is not a waste of your time.  Saving money is never a waste of time!  Also, go to the scanner...it doesn't hurt to see what coupons are available while you're in there.  There might be a coupon on something you're going in for.  You don't have to spend hours preparing...unless that's what you're into.

You might not be going on a shopping spree - I know that sometimes you just want to go buy stuff.....have a little bit of retail therapy.....but sometimes it's better to buy just one thing using your coupons.  For example, I bought a CC Cream & Mascara from Revlon for $0.73 (seventy three cents) with a bogo 50% off, MFG coup for $2 off eye product & MFG coup for $2 off foundation/face product, $5 Extra Bucks, $5 off two Revlon products CVS coupon from the red box scanner thing, & $3 off $15 cosmetics coup from the scanner......seventy three cents, I'll say it again.  It would have been better if I managed to get Extra Bucks on top of that but I'm learning.  I know a lot of other couponers want to stockpile, but that's not what I'm shopping for.  I'm not going to purposefully use all my coupons just because I have them...I'm mainly focusing on beauty items here.  Also I've never been a fan of keeping things in a stock pile....I got a good deal on Pantene shampoo once & now I don't even want to use whats left of it because I found that Suave Moroccan Infusion is my favorite.  I did once buy three of the Suave shampoos because I was out & knew I would use it in order to get Extra Bucks rewards.  Another side note - if you're looking for the best price on a single item, CVS won't have it.  For that go to Wal-Mart or Target, but you can use the specific CVS coupons to get things at ridiculously low prices!

Stop in often - Right across from where I grab lunch everyday is a CVS so I pop in, scan my card, check the coupons, and leave.  It's not a waste of my time because it's literally a driveway away.  You can scan your card about 2-3 times a week I've realized so sometimes I'll pop in & buy something or just stock up my coupons to pick something up on the weekend.  Also coupons are good for a little while so you can totally pick & chose them to use with sales during the week.  You can even make it a game if you want!

Multiple Transactions are allowed - While I've never done this you totally can do multiple transactions at a register.  While I was reading up on CVS coupon policy one blogger mentioned doing a transaction then moving the back of the line - because do you really want to be behind someone doing 3 transactions at a register?  Probably not.  So coupon considerately....if you get what I mean.
I folded it over bc I bought Mother's Day Cards too and couldn't fit the savings in the frame.

Stack coupons - Now this might be a little too far but you can use CVS coupons as well as Manufacturer Coupons in your purchase.  I tried this out in the example above & as you can see it's one MFG coup per item....so you can totally mix, match, & save!!!  My receipt is above with that example.

So that's what I've learned so far from trying to save money on my beauty product habit!  CVS has an easy coupon system so if you're trying to get into saving money or you want to see if you don get a coupon high check it out.  There are tons of resources out there to learn from as well - my favorite place for drug store deals & info is a blog called Nouveau Cheap.  Every week she posts a round up of the sales & mentions MFG coupons you can use to save even more money.  CVS is a great way to casually get into couponing especially if you want to save money on drug store make up!

How do you save money on things you love?  Are you a couponer?

xoxo, Moe

Connect on Twitter // Follow on Pinterest

5.08.2014

Boost Your Blog // On Comment Policies & Keeping a Positive Space

Ok, so this is a little weird to be a Boost your Blog article.....but I also feel like it's important.  This post is about keeping your blog (or any social media type of thing you have) a positive space that you feel comfortable in.  While I encourage everyone to express themselves & share differing opinions, this post is addressing that I deleted a comment on my YouTube channel because I didn't like it.  Now, as you know, the world isn't all unicorns & butterflies...people won't agree with you & people will voice it.  But for me there is a difference between sharing & being rude - constructive criticism and the sharing of your opinion can be done in a polite way, believe it or not.
If you've ever felt discouraged because a negative comment was left on your blog, I want to tell you something - It's ok to delete it.  All in all, your blog is your space.  Yes, you are putting something out there on the web for others to find - and that's the point.  But sometimes those that find your blog don't know how to play nice.  You're entitled to your opinion & they are entitled to their's - but you own your blog, you write your blog, it's yours.  You have the right to keep it a positive space.  I don't think this is something that crosses our minds when we get a negative comment.  At least for me I instantly think what did I do wrong to offend this person?  Can't they see I'm just a person here? and then I think Is it rude to delete their comment?  Honestly, they probably wrote it and left - it was a hit & run.  However, things can develop in to flat out bullying, etc....that's not what this post is about.

Create a Comment Policy
In order to make you feel in more control of the interactions of your blog, create a comment policy.  Your blog is a positive space - anyone who brings unnecessary negativity gets deleted (oh, along with spam! Man I hate that!).  Your comment policy doesn't have to be super specific & you don't even need to post it (though I would, just so you can direct people to your comment policy..but it's not necessary.)  Having a comment policy in place will make it easier to delete unwanted comments.  If you're like me you get in the I don't want to be rude mind frame - but the truth is it's your blog and you're entitled to positivity.  Your comment policy can be simply anything negative or anything that makes me feel uncomfortable will be deleted and just keep that in mind when reading through your comments.  Blogger allows you to add a little section above your comment box where you can post a little blurb.  Take advantage there & write something positive about keeping your blog a positive space.  If you're concerned about creating a community around something, you might want to take this policy a step forward & have it on it's own page or linked under a page with other blog policies (affiliate links, disclosures, etc).

Delete Negative Comments
Here's the next step - delete the comment that is negative or makes you feel uncomfortable.  Stand up for yourself & your right to a positive life.  So many hide behind their keyboard and post hate that, honestly, I feel like it gets lost in the mix.  I sometimes notice when bloggers start regulating comments - and that gets some people up in arms.  It is so funny that others think that they have the right to post a comment on a blog written by someone else and that the blogger should have to keep the comment for the sake of, I don't know, posterity? For opinion's sake?  To show that there are other people out ther? Who knows, but it's your blog...so delete any comments you feel invade your space or make you feel uncomfortable.  You'll feel better and you don't even have to address it to anyone.

You Don't Have to Defend Yourself
Have you ever been reading a blog (or any other social media type of thing) and the writer starts to defend the opinion they have?  Even if it's something small like I don't like this type of yarn, but it's ok if you do...it's just not for me. But if you like it, that's ok.  That sort of back & forth defensiveness....you don't have to do that.  If you don't like something or you do like something (whether it's a serious political stance or the face that you like pink over green) stand up for yourself.  Always.  No matter what.  I believe there are two things that I admire in a person - they admit when they are wrong & they stand up for themselves.

So I hope this helped you a little bit on when a negative comment comes your way.  But let me know which camp your in - camp delete it & move on or camp keep it, everyone can have an opinion.  I just wanted to share that you can do whatever you want with your blog - comments included.  Blogging is about being honest, discovering yourself, and reach out to those with like interests.

xoxo, Moe

Connect on Twitter // Follow on Pinterest

5.07.2014

Four Simple Goals for May 2014

Time for Four Simple Goals for May!  I am so happy the weather is getting warmer so that means some goals should include warm weather things right?  Hooray!  This month is going to focus on Spring cleaning too...last month we did the garage..boy you must think my house is a wreck with all the cleaning we have to do!  But seriously, I'm sure you know this, but it never ends.  There's always something somewhere to get cleaned.  I told Zach last month when we were doing the garage that I'd rather organize the whole house than pick up a single leaf.  Yard work makes me feel like I'm getting no where every time I do it.  But it's a part of life I guess!  Here are May's goals:

Maintain the gardening - plants, mowing, weed wacking, etc
I want to spend a little time planting each day - mainly a plantfest on the weekend - but just keep the front yard getting prettier as the summer comes nearer. This is laying the ground work to enjoy our yard during the summer.  I'm also going to include setting up the patio with nice twinkle lights & just making that a pleasant place to relax while grilling.

Clean something each night
I've realized that I've been slacking on my cleaning because I just don't feel like it.  But then, when it comes time to enjoy being home...my house is a wreck.  I've gotten off track of the put shit away train I was on and I need to get back to it.  So this should be a huge goal this month!  I want to clean at least one thing each night...maybe I'll make a little check list, because Lord knows a 26 year old needs a chore list.

Take a little getaway - get organized & go camping
Zach & I just need a little weekend vacation.  It would be so fun to just pick up & go one weekend.  We got a tent last year but never used it.  It's time to start planing a camping trip!  We've got a lot of fun camping gear Zach got at a yard sale one weekend so we might be roughing it real good.  I just really want to do an over night at a camp ground, maybe go to a museum or see some caverns, etc.  Nothing too primitive!

Crochet two more bags
Another little goal for myself is to crochet more.  I want to make a few crocheted bags for summer & have been pinning a lot on Pinterest.  My over all goal is to make 7 before the end of Summer which would be labor day.  Who knows if I'll really use them but it's a chance to try out different textures, patterns, and stitches.

So hopefully we'll get some stuff done this month.  What are your goals for May?  Is the weather getting warmer where you are???

xoxo, Moe

Connect on Twitter // Follow on Pinterest

5.06.2014

Trend Tuesday // Three Foundation Brushes You Should Try

I go back & forth (and back & forth) between using a brush for foundation and a sponge.  I do love my Beauty Blender but I've recently wanted to try out some brushes.  I own a few foundation brushes from Real Techniques but I wanted to try different brush shapes.  Recently I'd picked up the Elf Personal Blend Mineral Foundation (click here for my review!) and needed to figure out the best way to apply it to my face so I started to try a few in my collection - even purchase a few - and I stumbled upon a great use for the Elf Powder Brush!
For precision application try a dense, rounded, angle top foundation brush.  I recently purchased this set on amazon for under $14 bucks but you can buy this single one for $5 here.  An angled top brush really gives precision around your nose & blending under your eyes.  The density & roundness of the brush prevents streaks in your foundation & helps the foundation blend easily.  This is my favorite for thicker foundations like Revlon ColorStay Whipped & Rimmel Stay Matte Foundation.  But works great for foundations like CoverGril 3-in-1 as well.  I would avoid really liquidy foundations like Revlon Nearly Naked & Rimmel Matte BB Cream.

For liquid foundation try a flat topped foundation brush.  The one in the picture above is from my set here.  These flat top brushes glide around your face & help blend in foundation around the jaw line.  If you have texture issues or dry patches, I'd skip a brush & use a damp sponge as you don't want to pull up any flaky skin.  This is my favorite brush for foundations like the CoverGirl 3-in-1 & Almay Clear Complexion Foundation.

For mineral or powder foundations the Elf Powder Brush is amazing!  This brush is dense enough to pick up & hold powder and buffs the foundation right into your skin.  The large surface area covers a decent area of your face in one go.  This can work as a flat top brush for liquid foundations but powder foundation is where this brush really shines.  I like this with the Elf Personal Blend Mineral Foundation as well as NYX Stay Matte Not Flat Powder Foundation.

I've been loving using various brushes recently to see which brush works best with which foundations. I actually have a few brush videos on my YouTube channel, if you'd like some more affordable brush info watch them here & here.

xoxo, Moe

Connect on Twitter // Follow on Pinterest

5.01.2014

Revisiting April 2014 Goals

The end of another month has come...where is 2014 going?  I feel like this is the first time ever where I'm really wondering where time goes.  I'm really keeping track of time with these Four Simple Goals posts - is that a good or a bad thing?  This month I didn't really accomplish too much, honestly, when it comes to these goals.  But lets check out how I did on April's Four Simple Goals:

Plan for our garden in the Spring
I really don't know if a veggie garden is in the stars for us...I feel like it might be too much work that we don't want to do (read I don't want to do).  But I don know that I am going to do a tiered pot system on the deck off the kitchen for herbs & as a pretty display in our front garden.  Planting in the ground just didn't work for me last year.  The only in ground planting I want to do is something that spills over the front of the flower bed in the front & putting another hosta in the empty space in the flower bed.  So yeah...I guess I did plan.  I finally made up my mind.

Organize Closets/Cabinets
I guess the biggest closet in the house is the garage!  We finally cleaned out all the vintage stock we had since we're not doing that any more.  We're going to list it in a big lot on Craigslist & be done.  Sometimes you have to just move on - I know it might seem fleeting but you only live once & I think you should try as many things as you can, you know?  Anyway - now we have room for the camping stuff and perhaps I'll finally get around to setting up the kiln.

Collaborate on the blog with others
This is actually something I decided I don't want to do.  While I'd love to .... I also don't want to put unneeded pressure on myself.  My blog is my blog.  That sounds a bit harsh but I've found the more pressure I put on myself to do something to please others - like having to do my part a blog collaboration, etc - makes me not want to do it.  I never want to feel pressured to post and sometimes when I try to do something following a long with others - even if it's just a link party - I start feeling like I'm not doing what I want to do.  Not that blog collaborations are full of pressure but sometimes I just feel pressured.  I don't know how to explain it....but for now I want to keep this a place for me to share me.  Maybe I'm insane but I hope you get what I'm trying to say!

Work with Zach on a regular post on the blog
This is something we've talked about a little but haven't settled on.  I'd like to do more cooking together - in fact we made shish kabobs the other day & I didn't take a single picture!  But then again I want to live my life too....I dunno I feel like I'm very torn with blogging right now! gah!!!!


So I guess I completed a few things this month.  These goal posts really keep me accountable & I can't believe I've kept up with the posts so far.  Super surprising since I tend to let things like that slip!

What did you accomplish this month?  Anything worth bragging about?  Let me know!

xoxo, Moe 

Connect on Twitter // Follow on Pinterest // Peep me at Hello Cotton